Cirrus API Guide
Cirrus Open Cloud API
API Specification 1.8
Technical Summary
Cirrus is a secure Websocket based API with a JSON based messaging format. Cirrus
supports Request-response and publish-subscribe patterns. Responses might arrive
out-of-order. The endpoint is
wss://<API-HOST>.yanzi.se/cirrusAPI
Contact support if you are unsure which API-HOST you should be using.
Already familiar with the Yanzi solution? Skip ahead to our Quick Start
Introduction
Cirrus API is a secure open API supporting multiple simultaneous subscribers. The Cirrus API data model allow access to any data originating from any location with a uniform interface without the need to understand the sensor details.
The communication is based on JSON objects over web socket over an authenticated and encrypted SSL connection.
The Cirrus API allows access to the Yanzi IoT Platform including sensor data, configuration and edge analytics.
The main purpose of the Cirrus API is to allow partners and integrators to access data and system configuration to enable third party system integration and development of end user applications on top of the Yanzi Platform.

Cirrus API Overview
Yanzi IoT Platform
Below is an overview of Yanzi IoT Platform functionality where the green circles shows the software modules contained in the Yanzi IoT Platform. The light blue circles give examples of typical partner integration applications built on top of the Cirrus API.
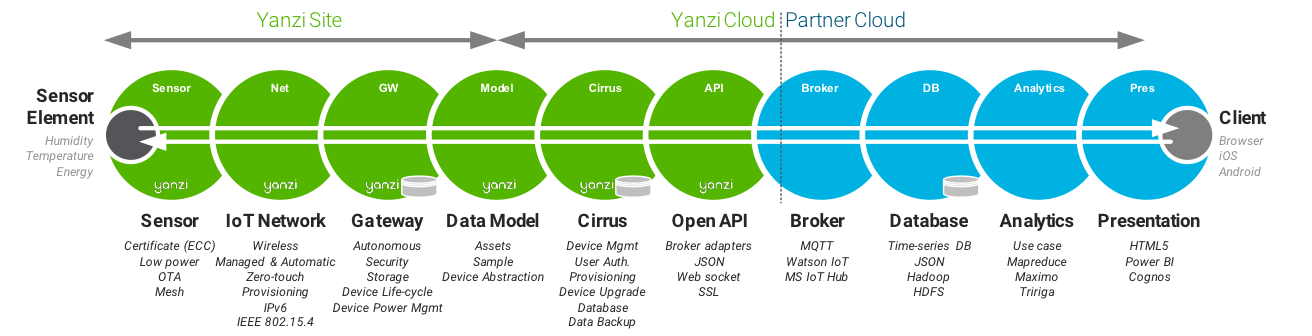
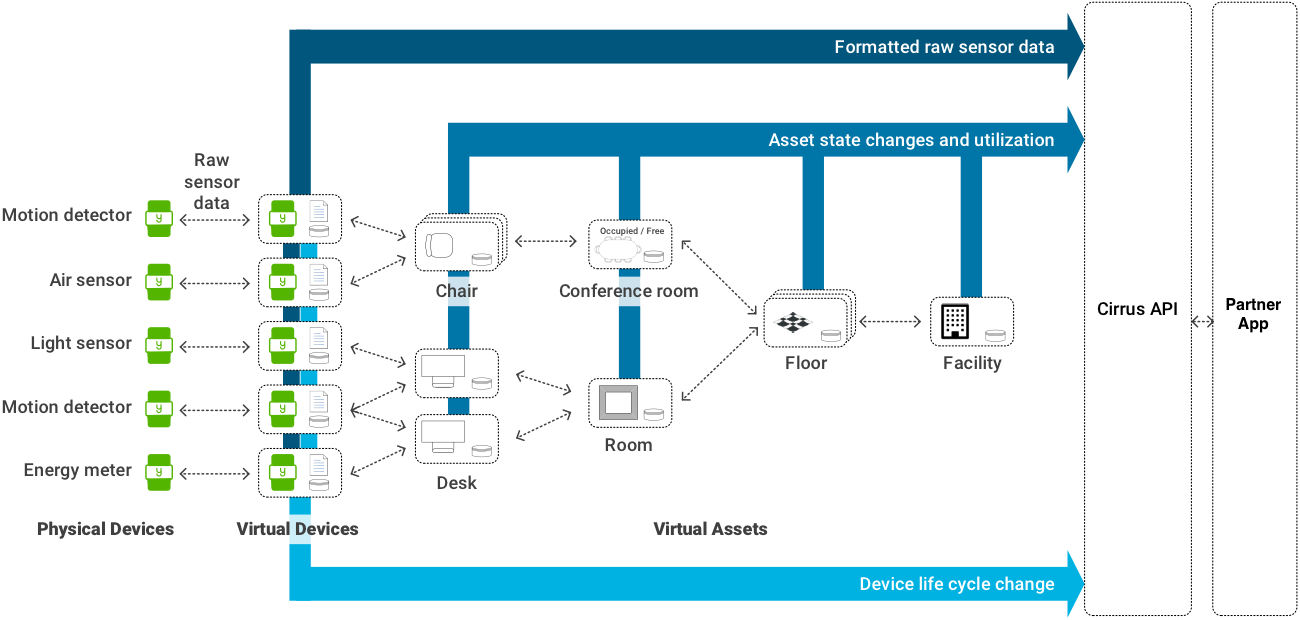
Yanzi IoT Platform - from Sensor to Application
Cirrus Cloud
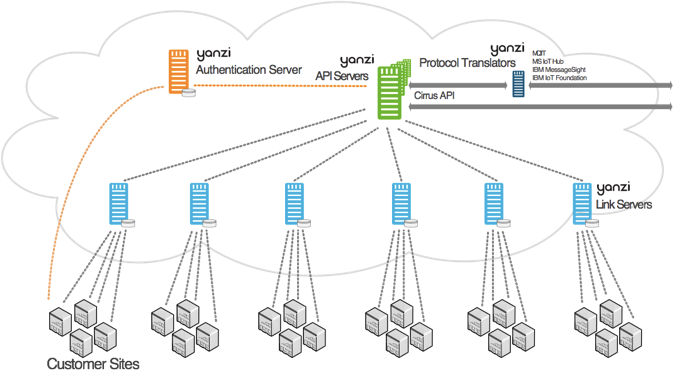
Yanzi IoT Platform - from Sensor to Application
Yanzi uses a distributed cloud model that provides scalability to millions of users and billions of things. Different types of servers are used: Authentication servers, Link servers and API servers.
The Authentication server’s main function is to provide certificates and authenticate users as well as servers in the system.
Link servers are easily instantiated close to customer sites for ease of scalability. The Link servers are responsible for Yanzi Gateway management, transparent proxy services, optimized data transport, remote device management and more.
API servers works as the interface towards external applications. The API servers hides the infrastructure behind it and can collect and forward data from any Gateway independent of location.
Yanzi System Models
Yanzi supports three system models.
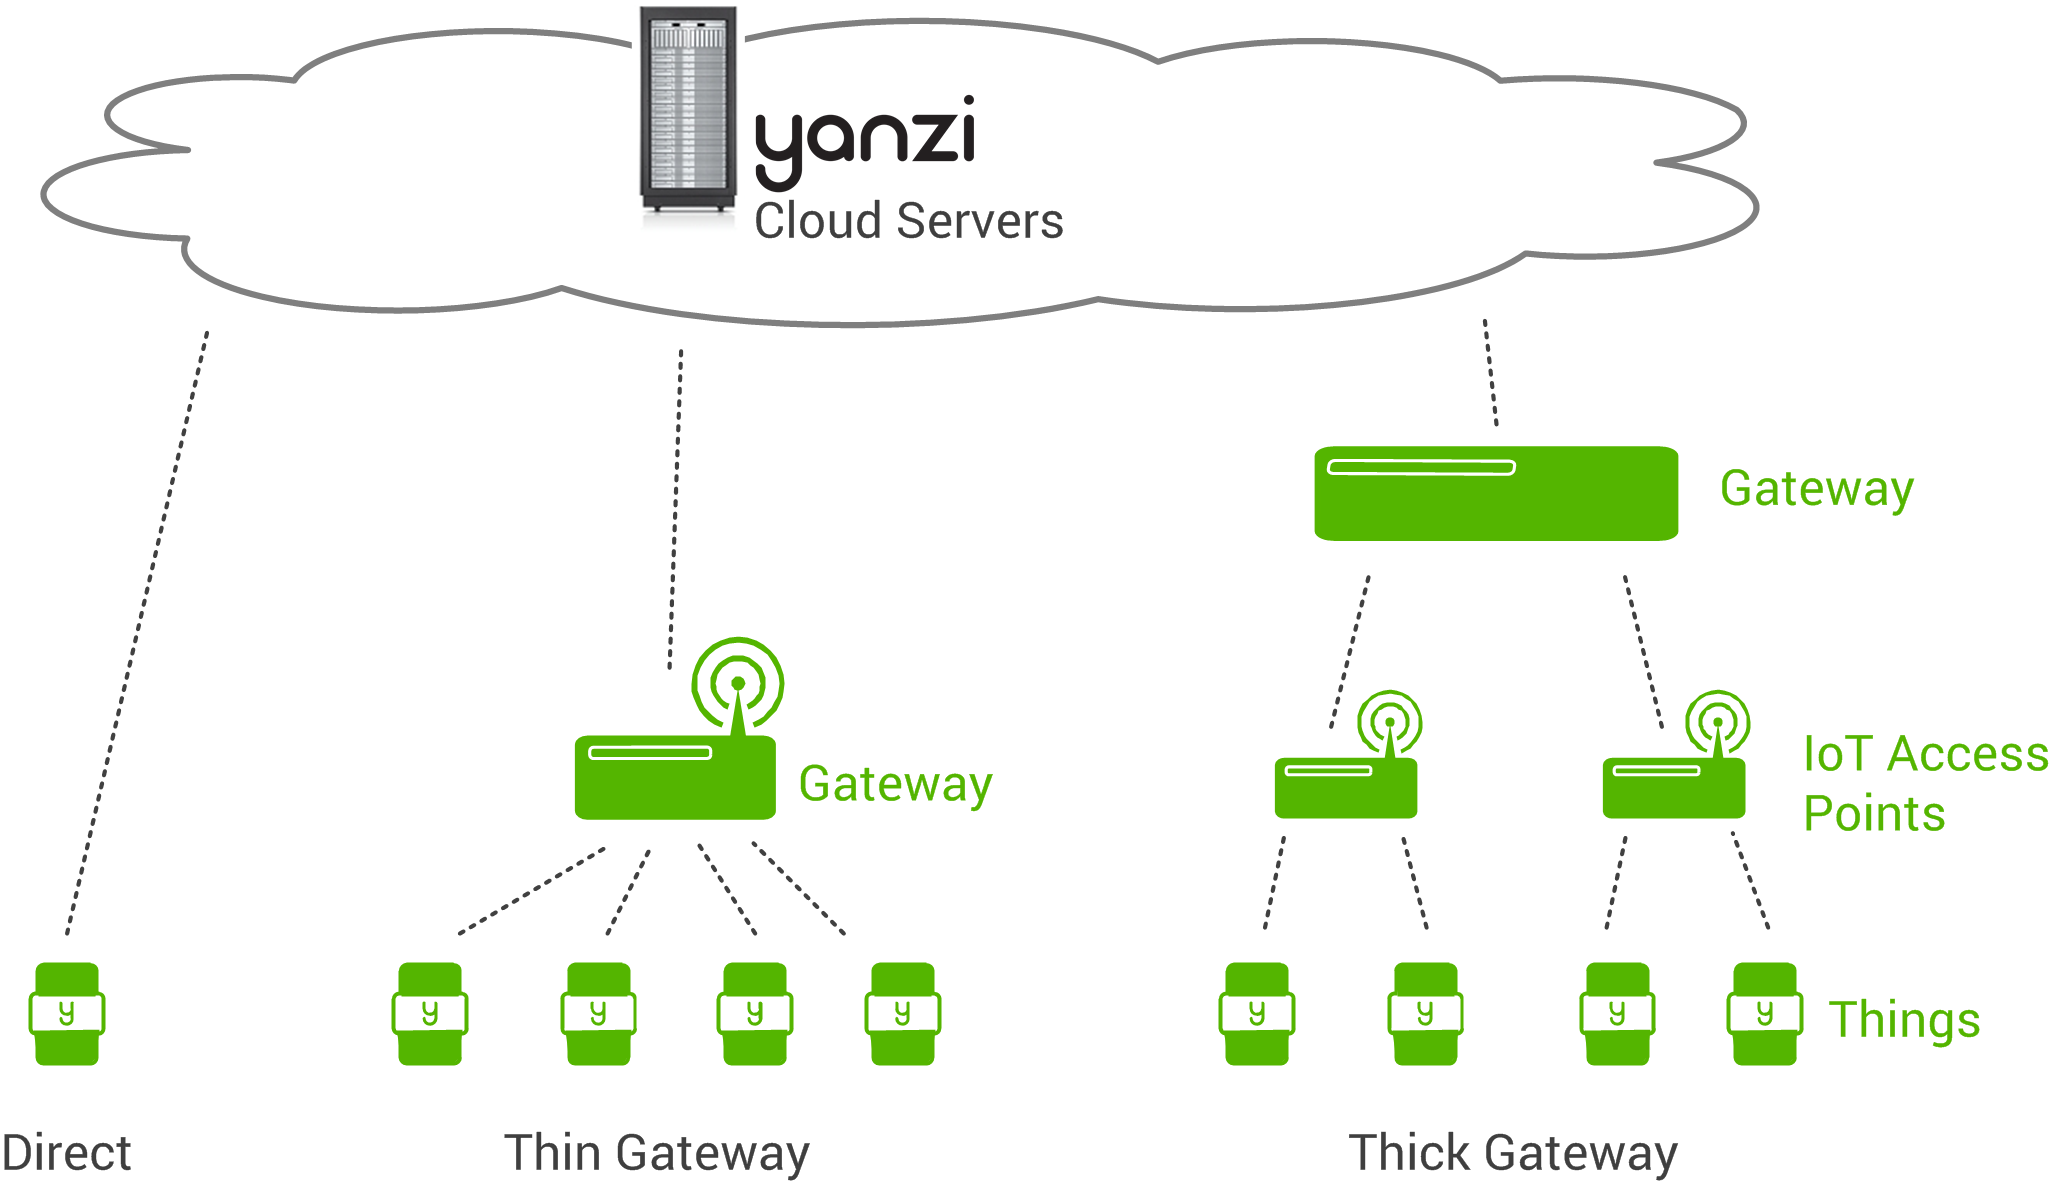
System models overview
Direct means a sensor connecting directly to the cloud. This means a small part of the Gateway functionality is included in the sensor. This is the smallest installation and requires an Internet connection per sensor.
Thin Gateway means a small to medium size IoT system with local support even if Internet is not available.
Thick Gateway means a large size IoT system with one or more aggregation points (IoT Access Points) aggregating into a large Gateway supporting thousands of sensors and cameras.
Quick Start
In this section we want to kick off a quick and easy initial integration with the Yanzi Cirrus API assuming:
- You have a Yanzi Live User
- You have a Yanzi solution up and running
After this Quick Start you should be able to:
- Authenticate and Login
- Check status of the Yanzi API
- Get temperatures
Python
1. Install Python 3
Mac specific installation tips below.
-
If you don't have Homebrew
- Open a terminal
- Run:
Bash 1ruby -e "$(curl -fsSL https://raw.githubusercontent.com/Homebrew/install/master/install)"- The script will explain what changes it will make and prompt you before the installation begins.
- Once you’ve installed Homebrew, insert the Homebrew directory at the top of your PATH environment variable by adding the following line at the bottom of your /.profile file.
unless you have OS X 10.12 (Sierra) or older, then useBash 1export PATH="/usr/local/opt/python/libexec/bin:$PATH"Bash 1export PATH=/usr/local/bin:/usr/local/sbin:$PATH- Run
Bash 1brew install python- Check that you have Python 3 installed with
Bash 1python3 --version -
If you do have Homebrew
-
Run
Bash 1brew install python -
Check that you have Python 3 installed with
Bash 1python3 --version -
2. Let's start coding!
- Import needed modules by opening a terminal and and running
| Bash | |
|---|---|
1 2 | |
-
You have to link the entire program further down, but first, let's go through some basics of the program.
- The first thing you’ll want to do is to check the status of the Yanzi Cirrus API by sending a ServiceRequest. A “success” response on that and you’re good to go! In your Python code it’ll look like this:
* Assuming a “success” from our ServiceRequest we’ll want to Authenticate and login using our Yanzi Live username and password. In your Python code it’ll look like this:Python 1 2 3 4 5
#Check API service status def serviceRequest(): ws.send(json.dumps({ "messageType": "ServiceRequest" }))* Now that we are logged in let’s get some data from one of our installed sensors. For this you’ll need your Location ID (a 6 digit number) and the Device ID of the sensor (ends with “-Temp“), which you’ll find in Yanzi Live. In this example we’ll get temperature data for the last hour. Note that we use Epoch in milliseconds.Python 1 2 3 4 5 6 7
#Login def login(ws): ws.send(json.dumps({ "messageType" : "LoginRequest", "username": username, "password": password })Python 1 2 3 4 5 6 7 8 9 10 11 12 13 14 15 16 17 18 19 20 21 22 23
#Get temperature for the last hour def getTemperatureLastHour(ws, locationID, unitDid): now = int(round(datetime.now().timestamp() * 1000)) print(now) nowMinusOneHour = now - 60 * 60 * 1000 ws.send(json.dumps({ "messageType": "GetSamplesRequest", "dataSourceAddress": { "resourceType": "DataSourceAddress", "did": unitDid, "locationId": locationID, "variableName": { "resourceType": "VariableName", "name": "temperatureC" } }, "timeSerieSelection": { "resourceType": "TimeSerieSelection", "timeStart":nowMinusOneHour, "timeEnd":now }, "timeSent": now }))
3. Let's put it all together
- Head over to Yanzi Quick Starts
- Clone or copy the Python Quick Start, and name it app.py
- Open app.py and update to your Username, Password, Location ID (usually a 6 digit number) and Device ID (should end with "-Temp"), which you can find in Yanzi LIve.
- Run it by opening a terminal and, in the directory where you copied/saved the file, run:
| Python | |
|---|---|
1 | |
- Happy coding! :rocket:
Node.js
1. Install Node.js
- Install Node.js and npm (if you don't already have it)
- Open a terminal
- Check that Node.s and npm is installed by running:
Bash 1 2
node -v npm -v
- Check that Node.s and npm is installed by running:
2. Let's start coding!
-
You have a link to the entire program further down, but first, let’s just go through some basics of the program.
- The first thing you’ll want to do is to check the status of the Yanzi Cirrus API by sending a ServiceRequest. A “success” response on that and you’re good to go! In your node code it’ll look like this:
JavaScript 1 2 3 4 5 6
function sendServiceRequest() { var request = { "messageType" : "ServiceRequest" } sendMessage(request); }- Assuming a “success” from our ServiceRequest we’ll want to Authenticate and login using our Yanzi Live username and password. In your node code it’ll look like this:
JavaScript 1 2 3 4 5 6 7 8
function sendLoginRequest() { var request = { "messageType" : "LoginRequest", "username" : username, "password": password } sendMessage(request); }- Now that we are logged in let’s get some data from one of our installed sensors. For this you’ll need your Location ID (a 6 digit number) and the Device ID of the sensor (ends with “-Temp“), which you’ll find in Yanzi Live. In this example we’ll get temperature data for the last hour. Note that we use Epoch in milliseconds.
JavaScript 1 2 3 4 5 6 7 8 9 10 11 12 13 14 15 16 17 18 19 20 21 22
function sendGetSamplesRequest() { var now = new Date().getTime(); var nowMinusOneHour = now - 60 * 60 * 1000; var request = { "messageType" : "GetSamplesRequest", "dataSourceAddress" : { "resourceType" : "DataSourceAddress", "did" : deviceID, "locationId" : locationId, "variableName": { "resourceType": "VariableName", "name": "temperatureC" } }, "timeSerieSelection" : { "resourceType" : "TimeSerieSelection", "timeStart" : nowMinusOneHour, "timeEnd" : now } }; sendMessage(request); }
3. Let's put it all together!
-
Copy the 2 required files in the same folder:
-
Install dependencies
| Bash | |
|---|---|
1 | |
-
Open app.js and update to your Username, Password, Location ID (usually a 6 digit number) and a Device ID (should end with “-Temp”, e.g EUI64-D0CA6FFFFE883C16-4-Temp), which you can find in Yanzi Live.
-
Run it by opening a terminal and running:
| Bash | |
|---|---|
1 | |
- Happy coding! :rocket:
Cirrus API JSON Objects
The Cirrus API uses JSON data. All JSON Objects passed to and from the Cirrus API are categorized in two kinds; the Cirrus Messages and Data Transferable Objects (DTOs).
The Cirrus API supports both a “hot data path” (live data) by the Publish/Subscribe mechanism and a “cold data path”(historical data) by the Request/Response mechanism. For live data the hot data path is recommended where as the cold data path can be used to recover data after loss of connectivity.
Cirrus Messages
Cirrus Messages are messages that can be sent and received on the top level of the cirrus connection. All cirrus messages have a messageType field which is used to determine the type of the message. Most cirrus messages come in request-response pairs. There are also messages that are sent in a broadcast fashion, such as SubscribeData.
A Cirrus response message includes a response code that can be used to check if the request was executed successfully, see ResponseCode for a complete list of response codes.
For detailed Cirrus Message formats, click here.
Data Transfer Objects
Data Transfer Objects (DTOs) are data objects. A Cirrus Message response can contain a list of DTOs with the requested data. DTOs contain a resourceType field that determine the type of a DTO.
For details, see DTO formats.
Cirrus API On A Single Endpoint
To simplify the Cirrus API usage, the client connects through an API server that hides the complexity of the Cirrus Cloud infrastructure. This enables a fast way to get started with integration and allows partners to focus development on their end application.
Setting Up a Connection to the Cirrus API
Connecting to and using the Cirrus API consists of three main steps:
Request service status
When communicating with the Cirrus API service, the first thing to do is request the status of the service. This is done by sending a ServiceRequest message to the Cirrus websocket:
| JavaScript | |
|---|---|
1 2 3 4 5 | |
The "version" and "clientId" attributes are optional. The "version" is the version of the client application and the "clientId" is a unique ID representing the client application. Those values are arbitrary selected by the client. It is recommended that a client id is generated once (and persisted to e.g. a file) and re-used for all future connections for troubleshooting and logging purposes.
Cirrus responds with the ServiceResponse that contains information about the service status and the type of sercive provided by the server.
Authentication
When the client has verified that the Cirrus service is operational (you received the ServiceResponse message) it is time to Authenticate.
Yanzi supports two authentication models:
- Username and Password
- Client Certificates (mTLS)
To authenticate using a username and password, send a LoginRequest to the Cirrus websocket:
| JavaScript | |
|---|---|
1 2 3 4 5 | |
| JavaScript | |
|---|---|
1 2 3 4 5 6 7 8 | |
Warning
If login is repeated before a session has expired, it is strongly recommended to save and reuse the sessionId of the previous session.
NOTE: From Cirrus API version 1.8.9 the number of concurrent sessions will be limited and new logins will be refused when the limit of number of different open sessions for the user has been reached. That will result in a ResponseCode errorChannelNotAvailable. This limit is designed to not be reached within normal operation. Even if that limit has been reached, Login with an existing valid sessionId is allowed. To login with use of an existing session id the below login request can be used:
| JavaScript | |
|---|---|
1 2 3 4 | |
Where the sessionId field is the sessionId received in the LoginResponse.
After a successful login other Cirrus requests (Cirrus messages) can be sent to retrieve information from the platform.
Note I: It is useful to always keep in mind that before being authenticated the only messages that will receive a response is the ServiceRequest and the PeriodicRequest. Any other messages received by a non-authenticated user will be refused. Please refer to given examples of how to operate with the Cirrus API.
Note II: If the WebSocket connection to Cirrus API is dropped, then the LoginRequest must be resent.
Connection Management to Cirrus API
Here is a list of guidelines in order to maintain a Cirrus API connection:
Keep the connection alive
When a connection to the Cirrus WebSocket can not be established due to network issues it is recommended to add a timer that triggers a new connect attempt e.g. 30 seconds later. If the connection keeps failing, the timer should try to re-connect on a regular interval.
Once the WebSocket connection is established start with sending the ServiceRequest.
Periodic request messages
When you have successfully logged in it is recommended to send a PeriodicRequest message on regular intervals to maintain the WebSocket session.
The WebSocket timeout depends on the client WebSocket implementation so if there are no other requests on the channel but the client wants to maintain the connection, the PeriodicRequest should be sent in a shorter interval than the socket timeout. For example, for a WS with a default timeout of 5 minutes, a recommended value would be to send a PeriodicRequest every minute to ensure the connection stays alive.
In any case, even if there is messages over the WS, the Yanzi Session will expire after some hours of no messages sent from the client. This is especially important when you subscribe to data and there are not other Cirrus requests on regular intervals.
Make sure that you get a PeriodicResponse in return. If you after three PeriodicRequests have not received any PeriodicResponse, you should close the connection and re-establish the connection by following the previous steps in this section.
If your connection is closed due to network issues, stop the timer that sends the PeriodicRequest and re-initiate the connection as described here.
Common Operations
Retrieving Locations
To retrieve a list of locations send the GetLocationsRequest to the Cirrus API service. The corresponding GetLocationsResponse contains a list of locations that you have access to.
Warning
The GetLocationRequest generates multiple responses.
You will in most cases receive several responses as they are responses from the different Link Servers in Cirrus. Each response contains a list, which may be empty, of the locations connected to that server. I.e. the lists needs to be merged to obtain the full list of locations the requesting user has access to.
Retrieving Units
Units are the representation of any physical or virtual object in the platform that may deliver Samples. Physical units are represented as chassis and has the “isChassis” variable set true.
To get a list of known units, you must first know which location the requested units are attached to.
Now that the locations are known, send a GetUnitsRequest to each of the locations that you are interested in:
| JavaScript | |
|---|---|
1 2 3 4 5 6 7 8 | |
Each location will reply with a GetUnitsResponse. In addition to the response from the local gateway, the cloud gateway will reply with another GetUnitsResponse, so multiple responses must be handled. The GetUnitsResponse contains a list of all Units that exist on the location and each unit is represented as a UnitDTO. Units can be both virtual or physical. As an example, a Presence sensor would be represented by 3 Units:
-
The Chassis (example did: EUI64-0080E1030005D746)
-
Motion (example did: EUI64-0080E1030005D746-4-Motion)
-
Temperature (exampled did: EUI64-0080E1030005D746-3-Temp)
Also, virtual Units are represented in the list of Units, e.g. Assets.
GetUnitsResponse in detail
An example message received from the gateway containing the units will look similar to this:
| JavaScript | |
|---|---|
1 2 3 4 5 6 7 8 9 10 11 12 13 14 15 16 17 18 19 20 21 22 23 24 25 26 27 28 29 30 31 32 33 34 35 36 37 38 39 40 41 42 43 44 45 46 47 48 49 50 51 52 53 54 55 56 57 58 59 60 61 62 63 64 65 66 67 68 69 70 71 72 73 74 75 76 77 78 79 80 81 82 83 84 85 86 87 88 89 90 91 92 93 94 95 96 97 98 99 100 101 102 103 104 105 106 107 108 109 110 111 112 113 114 115 116 117 118 119 120 121 122 123 124 125 126 127 128 129 130 131 132 133 134 | |
The message contains all Units. Some of the units might be the physical device (Such as a Yanzi Presence Mini) and other units will be the multiple sensors included in a physical device (Such as the temperature sensor or the motion sensor inside a Presence Mini)
Let's look in more detail at a Physical device chassis UnitDTO, for example:
| JavaScript | |
|---|---|
1 2 3 4 5 6 7 8 9 10 11 12 13 14 15 16 17 18 19 20 21 22 23 24 25 26 27 28 29 30 31 | |
If we look now at a sensor UnitDTO, for example:
| JavaScript | |
|---|---|
1 2 3 4 5 6 7 8 9 10 11 12 13 14 15 16 17 18 19 20 21 22 23 24 25 26 27 | |
Retrieving Samples from Units
After retrieving all the Units for a specific location, you are now able to send a request to retrieve samples from them. The request is the GetSamplesRequest and looks like this:
| JavaScript | |
|---|---|
1 2 3 4 5 6 7 8 9 10 11 12 13 14 | |
The did together with the locationId uniquely identifies the unit you want to get samples from.
Secondly the TimeSerieSelection object needs to be set to give details of number of samples and/or time peiod for the samples requested.
For example, the above request will retrieve the 10 samples recorded before the given time; 1456408346599 (Or in humanly readable form: Thursday, February 25, 2016 1.52.26 PM GTM)
For more information, refer to the Requesting historical sensor data section.
Matching requests to responses
Since Cirrus is a websocket based API, responses may arrive out of order. To facilitate in matching requests to responses, it is possible to add a MessageIdentifier. The message identifier is a custom string that will be copied from the request to the response. For instance:
| JSON | |
|---|---|
1 2 3 4 5 6 7 8 9 10 11 12 13 14 15 16 17 18 19 20 | |
Yanzi Sensor Type Representations
All Units have a default Sample type which will be returned by the GetSamplesRequest if not a specific “variableName” is set.
For example a Unit of type inputMotion the default sample is the SampleMotion. Below the default Sample types are listed together with the UnitType and VariableName corresponding to the Yanzi Sensor values:
Yanzi Motion+
| Representing Unit | UnitType | SampleType | VariableName |
|---|---|---|---|
| Chassis | physicalOrChassis | SampleUpState | upLog |
| Humidity | humidity | SampleHumidity | relativeHumidity |
| Illuminance | illuminance | SampleIlluminance | illuminance |
| Motion | inputMotion | SampleMotion | motion |
| Noise | soundPressureLevel | SampleSoundPressureLevel | soundPressureLevel |
| Temperature | temp | SampleTemp | temperatureK |
Yanzi Health
| Representing Unit | UnitType | SampleType | VariableName |
|---|---|---|---|
| Chassis | physicalOrChassis | SampleUpState | upLog |
| Motion | inputMotion | SampleMotion | motion |
| Atmospheric Pressure | pressure | SamplePressure | pressure |
| Temperature | temp | SampleTemp | temperatureK |
| Particulate Matter | particulateMatter | SampleParticulateMatter | particulateMatter |
| Carbon Dioxide | carbonDioxide | SampleCO2 | carbonDioxide |
| VOC Index | volatileOrganicCompoundIndex | SampleVOCIndex | volatileOrganicCompoundIndex |
Yanzi Comfort
| Representing Unit | UnitType | SampleType | VariableName |
|---|---|---|---|
| Chassis | physicalOrChassis | SampleUpState | upLog |
| Carbon Dioxide | carbonDioxide | SampleCO2 | carbonDioxide |
| Humidity | humidity | SampleHumidity | relativeHumidity |
| Noise | soundPressureLevel | SampleSoundPressureLevel | soundPressureLevel |
| Atmospheric Pressure | pressure | SamplePressure | pressure |
| Temperature | temp | SampleTemp | temperatureK |
| VOC | volatileOrganicCompound | SampleVOC | volatileOrganicCompound |
Yanzi Presence Mini
| Representing Unit | UnitType | SampleType | VariableName |
|---|---|---|---|
| Chassis | physicalOrChassis | SampleUpState | upLog |
| Motion | inputMotion | SampleMotion | motion |
| Temperature | temp | SampleTemp | temperatureK |
Yanzi Presence
| Representing Unit | UnitType | SampleType | VariableName |
|---|---|---|---|
| Chassis | physicalOrChassis | SampleUpState | upLog |
| Humidity | humidity | SampleHumidity | relativeHumidity |
| Temperature | temp | SampleTemp | temperatureK |
| Motion | inputMotion | SampleMotion | motion |
Yanzi Climate
| Representing Unit | UnitType | SampleType | VariableName |
|---|---|---|---|
| Chassis | physicalOrChassis | SampleUpState | upLog |
| Humidity | humidity | SampleHumidity | relativeHumidity |
| Temperature | temp | SampleTemp | temperatureK |
Yanzi Plug
| Representing Unit | UnitType | SampleType | VariableName |
|---|---|---|---|
| Chassis | physicalOrChassis | SampleUpState | upLog |
| Energy | inputEnergyMeter | SampleElectricalEnergySimple | totalpowerInst |
| Output | output | SampleOnOff | onOffOuptut |
Yanzi Footfall
| Representing Unit | UnitType | SampleType | VariableName |
|---|---|---|---|
| Chassis | physicalOrChassis | SampleUpState | upLog |
| Footfall | footfall | SampleFootfall | counter |
Yanzi Katrin Hand Towel Dispenser
| Representing Unit | UnitType | SampleType | VariableName |
|---|---|---|---|
| Chassis | physicalOrChassis | SampleUpState | upLog |
| Temperature | temp | SampleTemp | temperatureK |
| Distance | distance | SampleDistance | distance |
| OpenClosed | OpenClosed | SampleOpenClosed | openClosed |
| Dispenser | dispenser | SamplePercentage | percentage |
Yanzi Katrin Toilet Dispenser
| Representing Unit | UnitType | SampleType | VariableName |
|---|---|---|---|
| Chassis | physicalOrChassis | SampleUpState | upLog |
| Temperature | temp | SampleTemp | temperatureK |
| Distance 1 | distance | SampleDistance | distance |
| OpenClosed | OpenClosed | SampleOpenClosed | openClosed |
| Dispenser | dispenser | SamplePercentage | percentage |
| Distance 2 | distance | SampleDistance | distance |
Product Id's
| Product Id | Name |
|---|---|
| 0090DA0301088010 | Footfall Camera |
| 0090DA0301010504 | Hybrid Mesh EU |
| 0090DA0301020011 | IoT Access Point |
| 0090DA0301020012 | IoT Access Point |
| 0090DA0301020010 | IoT Access Point |
| 0090DA0301010534 | Katrin Hand Towel M Dispenser |
| 0090DA0301010535 | Katrin Toilet Dispenser |
| 0090DA03010104A0 | Yanzi Climate |
| 0090DA0301010522 | Yanzi Comfort |
| 0090DA0301020421 | Yanzi Gateway |
| 0090DA0301020423 | Yanzi Gateway |
| 0090DA0301020422 | Yanzi Gateway |
| 0090DA0301020424 | Yanzi Gateway |
| 0090DA0301020426 | Yanzi Gateway |
| 0090DA0301010502 | Yanzi IoT Mesh |
| 0090DA03010104A3 | Yanzi LED |
| 0090DA03010104B0 | Yanzi Motion |
| 0090DA0301010521 | Yanzi Motion+ |
| 0090DA0301010491 | Yanzi Plug |
| 0090DA0301010524 | Yanzi Presence |
| 0090DA0301010532 | Yanzi Presence Mini |
| 0090DA0301010545 | Yanzi Health |
Get Non-default Samples from Units
To collect Samples of a different type from a Unit the VariableName needs to be set. Below is an example of how to get the SamplePosition.
| JavaScript | |
|---|---|
1 2 3 4 5 6 7 8 9 10 11 12 13 14 15 16 17 | |
The GetSamplesResponse returned will look like:
| JavaScript | |
|---|---|
1 2 3 4 5 6 7 8 9 10 11 12 13 14 15 16 17 18 19 20 21 22 23 24 25 26 27 28 29 30 31 32 33 | |
Keep in mind that the SampleListDTO will always contain the VariableName value that describes what kind of samples the list holds.
For all values that the VariableName object can contain, refer here. If you request a sample type that the Unit does not have the request will timeout and you will get no response back.
Subscribing to Data, Slots and Events
It is possible to get data and events pushed to the websocket by subscribing to data.
To start a subscription send a SubscribeRequest message.
Currently subscriptions are only supported on the level of a locations, which means that it is not possible to only subscribe to, e.g. data for a specific Unit.
Though there are different subscription types that will result in different kind of information being pushed to the websocket session. See the SubscriptionType.
-
Subscribing to raw data or Asset data will push data samples as soon as they are collected in the Gateway. The different types of data subscriptions are: data, sensorData, assetData and occupance.
-
Subscribing to data slots will push aggregated data every 10 minutes as SlotDTO. The different types of Slot subscriptions are: sensorSlots, occupancySlot and assetSlots. Read more about Slots here.
-
Subscribing to config will push an event telling that the configuration of a unit has changed.
-
Subscribing to lifecycle will push data of lifecycle changes in the system, e.g. when a new sensor connects or when the Gateway looses contact with a sensor.
Example SubscribeRequest:
| JavaScript | |
|---|---|
1 2 3 4 5 6 7 8 9 10 11 12 | |
In return you will normally get two SubscribeResponse messages indicating whether the subscription succeeded. The “responseMessage” contains the epoch time when the subscription will expire. Make sure to send a new SubscribeRequest before the expiration time to keep your subscription alive.
There will be normally 2 messages, one coming from the Gateway device in your building and another from the server, indicating that both the gateway and the cloud server have received the subscription request. If the gateway were offline, you can still subscribe to, for example, lifecycle updates, receiving one SubscribeResponse only from the server. If the subscription is still active, then a lifecycle message will be sent from the server once the gateway becomes online again.
Example SubscribeResponse:
| JavaScript | |
|---|---|
1 2 3 4 5 6 7 8 9 10 11 12 13 14 15 16 17 18 19 | |
When the subscription is active, SubscribeData messages will be broadcast each time the subscribed resources receives new data.
Example SubscribeData of lifecycle type for sensor going online:
| JavaScript | |
|---|---|
1 2 3 4 5 6 7 8 9 10 11 12 13 14 15 16 17 18 19 20 21 22 23 24 25 | |
For a device going offline, the eventType name would be physicalDeviceIsNowDOWN
NOTE: Currently, subscription to specific units is not supported by CirrusAPI, therefore a SubscribeRequest to a valid locationID subscribes to all units relevant to the SubscriptionType in the specified location.
Requesting Historical Sensor Data
To request historical data from a sensor, send a GetSamplesRequest message. Specify the did and the locationId of the unit you would like to request data from using a DataSourceAddress.
If there is no variableName added, the samples from the default DataSource for that unit will be provided. See Sensor Type Representations.
Specify also the timeSerieSelection to select the range of data you would like to receive. You can request all the samples between two points in time using timeStart and timeEnd or a specific number of samples after or before a point in time using the timeStart field and the “numberOfSamplesBeforeStart” or “numberOfSamplesAfterStart” fields.
These fields need to contain positive integers in order to work, otherwise you will receive a response with the responseCode set to "errorInvalidMessage".
Here are all possible combinations of attributes that can be used in the “timeSerieSelection”:
-
timeStart and timeEnd.
-
timeStart and numberOfSamplesBeforeStart
-
timeStart and numberOfSamplesAfterStart
When requesting for samples you always need to keep in mind that the returned amount of samples can not be more than 2000 for a single request. This is an example of retrieving samples:
| JavaScript | |
|---|---|
1 2 3 4 5 6 7 8 9 10 11 12 13 14 | |
There are 3 possible responses for the above request:
-
First, is the case that there are no samples for that period in time. In this case, a response with an empty sampleList will come back.
-
Second case is the one where samples for that period of time do exist, but are less than 2000 in total. A response will come back containing all of them.
-
Last case is when there are more than 2000 samples for that period of time, meaning that the response will contain only the latest 2000 samples. If a request is made asking for more than 2000 samples, it will be processed, but the response will only contain 2000 latest samples.
To retrieve all samples for a long period of time, like for months or even years where it is very likely that the number of samples recorded over the period exceeds 2000.
To retrieve more than 2000 samples in total, you it is recommended to follow the process described below.
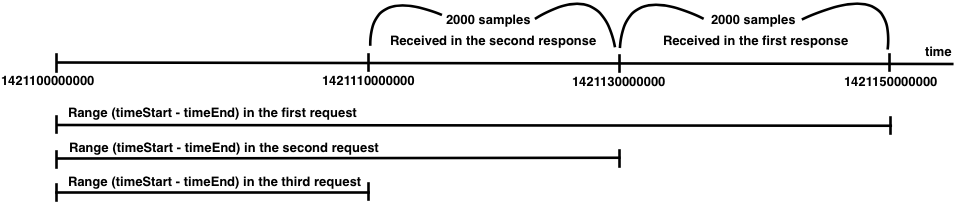
Let’s say that you would like to receive all samples between 1421100000000 and 1421150000000 timestamps.
Then you have have a request with:
-
startTime = 1421100000000, and
-
endTime = 1421150000000.
The first request you should do is one that covers the whole period. It will look something like this:
| JavaScript | |
|---|---|
1 2 3 4 5 6 7 8 9 10 11 12 13 14 | |
From the response that will be received, one of the most important attributes is the range that will contains both timeStart and timeEnd values.
This range specifies the time span of the samples included in the response and ensures that there are, or there are not new samples between the indicated timestamps.
If there are no samples for that period, the range will be the same as the request’s and the sampleList will be empty.
This way you know that there are no samples between the two requested times. If there were more than 2000 samples available for the requested period, then the range of the response will be smaller from the one in the request, and will cover only the time span of the returned samples. In this case, the response will look like this:
| JavaScript | |
|---|---|
1 2 3 4 5 6 7 8 9 10 11 12 13 14 15 16 17 18 19 20 21 22 23 24 25 26 27 28 29 30 31 32 33 34 35 36 37 38 | |
After receiving the first response, a second request need to be sent. This request will have have the same timeStart as the first one but the timeEnd should be equal to the timeStart of the range in the first received response. So the second request will look like this:
| JavaScript | |
|---|---|
1 2 3 4 5 6 7 8 9 10 11 12 13 14 | |
This is done because the samples between 1421130000000 and 1421150000000 have already been received and now the missing period is between 1421100000000 and 1421130000000. In general the process looks like this:
Slots
A slot is an aggregated sensor value over a fixed time period. The data from a sensor (or Assets) is collected during a fixed time period (currently 10 minutes) and are sent to the subscriber with the same interval. The slot contains the min, max, sum and the number of samples used for this slot. To subscribe to slots the following types are available: assetSlots, sensorSlots or occupancySlots (see SubscriptionType).
To request historical slots the GetSamplesRequest is almost the same as for normal samples. The only difference is that the TimeSerieSelection contains a SlotSize. The only supported SlotSize is min10. See the example below:
| JavaScript | |
|---|---|
1 2 3 4 5 6 7 8 9 10 11 12 13 14 15 16 17 18 | |
The response contains a list of SlotDTO's instead of samples. Each SlotDTO contains the max, min, sum (called aggregateValue) and the number of samples that contributed to sum. The maxTime and the minTime is timestamp of the max and the min sample.
| Text Only | |
|---|---|
1 2 3 4 5 6 7 8 9 10 11 12 13 14 15 16 17 18 | |
Assets
Asset Aggregation
Yanzi platform supports virtual data aggregation units named Assets. Assets are automatically configured and created at time of installtion if installing the Yanzi solution through Yanzi Lifecycle and a GeoJSON floorplan is used. Using the GeoJSON floorplan will create an hierarchy of Assets. Please read the chapter about Building Models in Yanzi Docs to learn more about how Yanzi automatically create Assets at time of installation.
Some applications may benefit from aggregated data instead of raw sensor data and the concept of Assets can simplify and accelerate development of such applications.
The virtual asset reports data as any other Unit. What kind of data depends a bit on the UnitType. Asset data is generated from the data sources connected to it. Data sources are added to the asset through the AddUnitPropertyRequest using the Enum PropertyName dataSource. An asset has its own configuration and data storage.
Asset data
An asset performs some kind of aggregation of sensor data. As an example, an application aim to know whether there are people in a specific conference room.
Connecting motion data as a dataSource to an asset will result in a number of assets generating SampleAsset data. Below are the most common asset data:
- A Desk, Chair or similar will report occupancy state "occupied" if any of the motion data sources has detected motion over the last 5 minutes, else it will report "free".
- A ConferenceRoom will report occupancy data, also relying on asset data sources such as the Desk and Chair input. It will also report utilisation data showing the percentage of the total number of Chairs belonging to the Conference room that are being occupied.
- When an asset has climate data sources (see below) multiple data sources of the same type will result in a new sample presenting the mean value.
- SampleCO2
- SampleHumidity
- SampleIlluminance
- SamplePressure
- SampleVOC
-
SampleTemp
-
Asset data can be subscribed to as described in Subscribing to Data, Slots and Events.
Assets can be created using the CreateUnitRequest message.