Yanzi IoT User Manual
Disclaimer
Information in this user manual is provided in connection with Yanzi products. No license, express or implied, by estoppel or otherwise, to any intellectual property rights is granted by this document. Except as provided in Yanzi’s Terms of Service and other sales conditions for such products, Yanzi assumes no liability whatsoever, and Yanzi disclaims any express or implied warranty, relating to sale and/or use of the Yanzi products including liability or warranties relating to fitness for a particular purpose, merchantability, or infringement of any patent, copyright or other intellectual property rights. Products from Yanzi must be used only for smart office applications as recommended by Yanzi and are not designed, intended or authorized for use for critical applications, including, but not limited to, life support, health and safety, aviation, nuclear, and security applications or for any other application in which the failure of the Yanzi product could create a situation where personal injury or death may occur. Yanzi may make changes to product(s) and/or the service described in this manual, specifications and product descriptions at any time, without notice.

Using your Yanzi Products safely
- Follow the battery requirements before installing any batteries.
- Never force a connector into a port. If the connector and port don’t join with reasonable ease, they probably don’t match. Make sure that the connector matches the port and that you have positioned the connector correctly in relation to the port.
- Protect your Yanzi products from direct sunlight to avoid overheating (check product brief for environmental operating range)
- Keep away the Yanzi products from sources of liquid, e.g. drinks, bathtubs, washbasins, shower stalls and so on.
- Use Yanzi products in environments according to specification. Most products are targeted for indoor office use only.
- Only use Yanzi provided power supplies for products requiring external power in countries where Yanzi provides this. For other countries, only use certified PoE injectors/PoE switches (compliant to IEEE 802.3af) and certified USB power supplies to make sure equipment and output voltage/current is within specification.
- There are no user-serviceable parts inside Yanzi products. Service personnel must always unplug external power supply, remove batteries, and turn off UPS battery before performing service operations.
About handling
Your Yanzi products may be damaged by improper storage or handling. Take caution not to drop them during transport and installation. The passive infrared sensor elements (PIR) (used in e.g. Yanzi Motion, Yanzi Motion+, Yanzi Presence, and Yanzi Presence Mini) are particularly sensitive to external force, so handle them with extra care.
Warning
WARNING: Do not attempt to open or disassemble any Yanzi products. You run the risk of electric shock and voiding the limited warranty. No user-serviceable parts are inside.
Yanzi Lifecycle
Introduction
Yanzi Lifecycle is the tool for managing your Yanzi infrastructure and sensors throughout the entire lifecycle - from planning to installation, changes and monitoring of existing systems as well as redeployments.
System overview
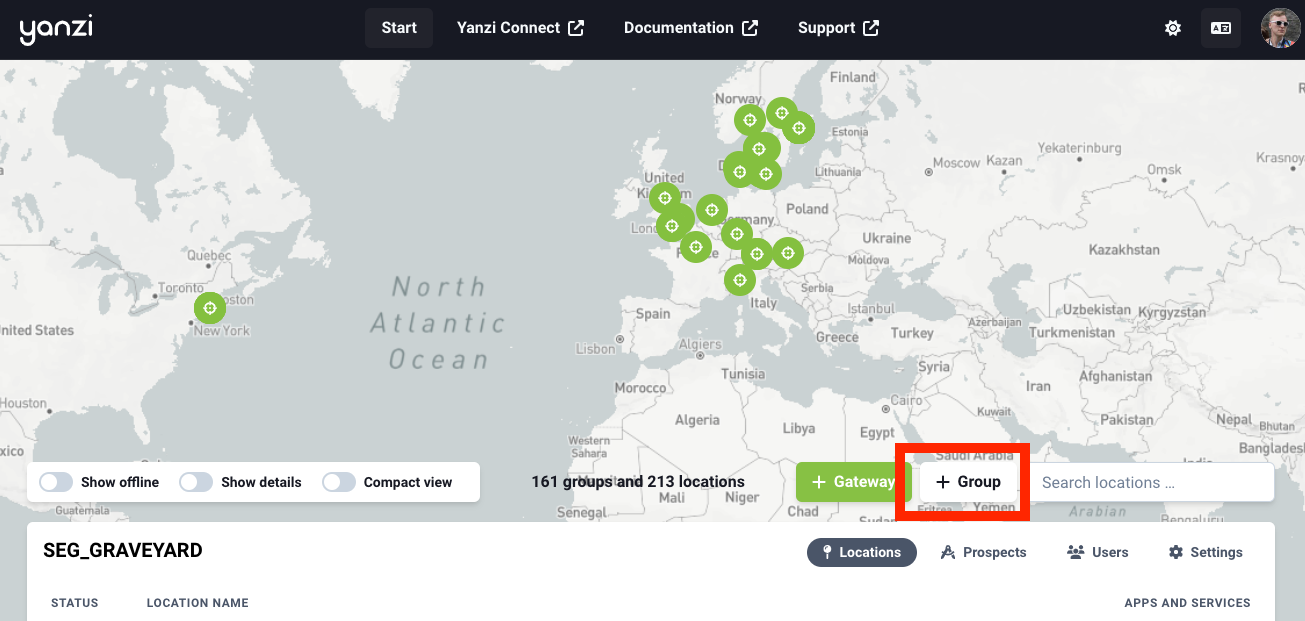
The Yanzi access and permission hierarchy consist of three levels; Users, Groups, and Locations.

A User is the person who signs in to Yanzi Lifecycle, for instruction on how to create a User - click here. A User can have the following levels of access to one or several Groups;
| Level | Manage users | Configure system | Install sensors | Set outputs | Read data |
|---|---|---|---|---|---|
| Admin | Yes | Yes | Yes | Yes | Yes |
| Manager | Yes | Yes | Yes | Yes | |
| Installer | Yes | Yes | Yes | ||
| Writer | Yes | Yes | |||
| Reader | Yes |
- Read data - A user with read access to a Group can view the sensor data and connectivity for all Locations aggregated in that Group.
- Set ouputs - A user can can also interact with device functions, e.g. toggle a Yanzi Plug on or off.
- Install sensors - A user can install new sensors and gateways to the system.
- Configure system - A user can change configuration in the system, for example by uploading floorplans, creating and deleting assets, and renaming and reconfiguring sensors.
- Manage users -- A user can add, remove and change the access rights for all users in the specific group.
Groups (previously "accounts") is what aggregates Locations and can typically be a way to separate customers. A User can have admin rights to Group "Customer 1" but read-only rights to "Group Customer 2". Whenever a new gateway is registered, the User registering it will assign it to a Group.
Warning
Please note that it is NOT possible to move a Location from one Group to another.
Locations get created automatically when a User registers a gateway to a Group. Meaning that each Yanzi Gateway is represented by a Location, with a unique Location ID, in the system.
Create a new User
This section explains how to create a new User, i.e. the login to Yanzi Lifecycle. Please click here for an overview of the permission hierarchy in Yanzi Lifecycle.
To create a User, go to Yanzi Lifecycle and click Sign up

The fields below will now appear in your browser. Fill in your details and click Next.

You will then receive an email to create your password. If you don't get the email in your inbox within a few minutes - please verify the email isn't in your spam/junk folder.
Groups
A Group is what aggregates Locations in the Yanzi system, to see an overview of this click here.
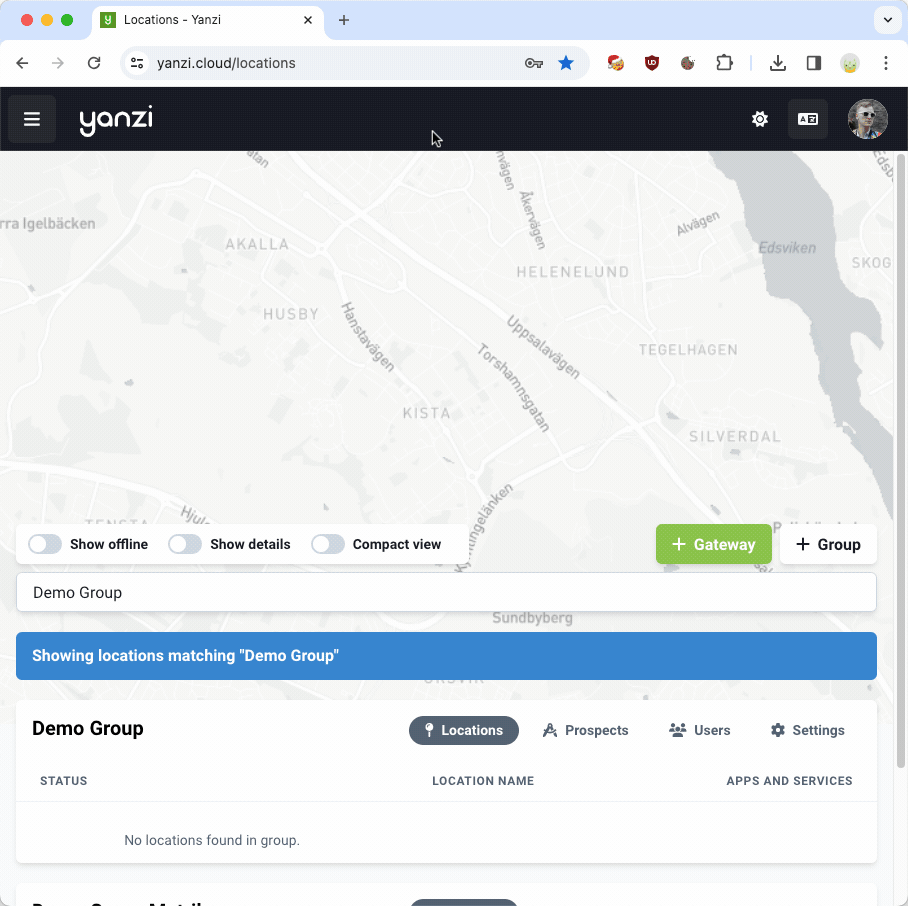
Create a new Group
Sign in to Yanzi Lifecycle, click + New Group. Name your Group and Save.
Renaming an existing Group
Select the Group you'll like to rename from the list of Groups you have access to, then settings and click Rename.
Grant User(s) access to a Group
To add a user to a group, click the "Users" tab in the group you want to edit. Click "add user" to grant a user access. The available access levels are presented in the table in the UI. Always follow the least responsibility principle when assigning rights.
Edit a Users permission level to a Group
To edit a user in a group, click the "Users" tab in the group you want to edit. Click the pen icon next to the user you wish to edit. Select the new access level. Always follow the least responsibility principle when assigning rights.
If you are an admin of that Group, you will see who the owner/creator of the Group is, which other User that have access to the Group as well as their permission level. As an admin of a Group, you can also at any point in time grant/revoke Users access to that Group as well as edit their permission level.
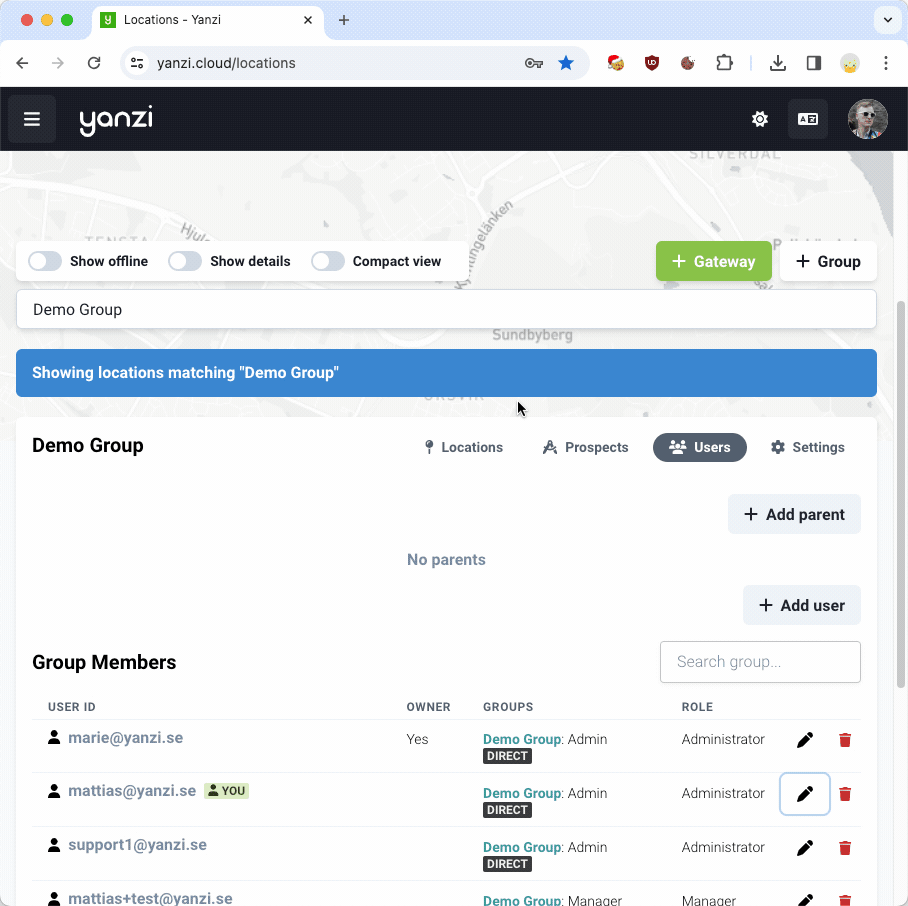
Remove a user from a group
To remove a user from a group, click the "Users" tab in the group you want to edit. Click the trash icon next to the user you wish to remove.
Hierarchical groups
Groups can be members of other groups. See Hierarchical Groups for more
Models and assets
Yanzi supports and promotes the use of building models to ease configuration and change management. More information is available here.
Deployment checklist
For a smooth and successful deployment of a Yanzi system, we strongly recommend to follow our Deployment checklist that will guide your team through the different stages of the deployment, which are described in more detail in the following sections. The latest deployment checklist can be found here.
Prospects / Planning
Prospects are a powerful way of planning infrastructure and sensors of an upcoming project. A prospect will be saved in a Group you choose and can later be imported directly to a new installation.
Note
Alternatively, you can choose to first register your gateway and then access "Plan" from that location directly. Using the "Plan" feature within a location looks and works the same way as an Prospect.
This also applies if you need to add more sensors to an existing installation.
See the system overview information on how Groups work. Should you need to create a new Group prior to creating your new Prospect, you can find instructions on how to do so here.
Creating a new Prospect
- To create a new Prospect, simply click + Create new while in the Prospects view in Yanzi Lifecycle. New your new Prospect, select the Group you want to store the Prospect in and click Save.

- Follow the steps to add one or more floors.
Supported file formats: Yanzi GeoJSON, PNG and JPG
Note
Some features in Yanzi Lifecycle, such as the live utilization, are only available if you use a Yanzi GeoJSON. If you don't have your own Yanzi GeoJSON yet, you can use our example Yanzi geoJSON to try it out.
The below information applies to both Prospects and for updating existing installations (Locations).
Adding infrastructure
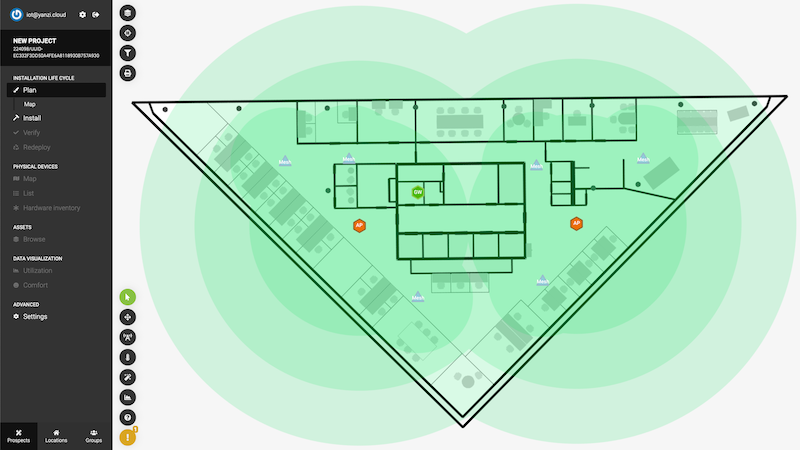
Start planning by adding the infrastructure, using the selector in the bottom-left section of the screen. Yanzi Lifecycle will guide you and show a coverage estimation. For existing installs, you can also use this tool to plan and estimate how to expand coverage further.
Adding sensors
Add sensors by selecting the sensor type, using the selector in the bottom-left section of the screen, and plot the sensors on the features you want them to be assigned too. You can also use this tool in existing installations at any time to plan more sensors for your Location.
Install
Install Infrastructure
Installing your Yanzi infrastructure is done in two steps, physically connecting and mounting your hardware and registering it in Yanzi Lifecycle.
1. Physical installation
Note
Most Yanzi Gateways and Access Points ship with a wall and ceiling mount included, instructions on how to mount GWs/APs can be found here.
Please refer to this section for an overview of your gateways ports and switches.
Ethernet Gateway
To be able to install the infrastructure in Yanzi Lifecycle, it must first be physically installed and properly connected to power and the internet. For Ethernet-based installations, please see our network requirements.
To connect your Ethernet-based gateway:
- Insert the included power adapter in a wall outlet and connect it to the power port on the gateway
Some Gateways support PoE, please refer to the product briefs to verify if your gateway is PoE enabled. - Enable the backup battery, as shown here
- Connect the gateway to the internet using the gateways right-hand Ethernet port
Note
If you are using Access Points in your installation, repeat the above steps for each Access Point. Please make sure you follow the network requirements for all Access Points as well as the gateway.
4G Gateway
Note
When using a 4G Gateway you'll need to insert a supported SIM card and configure your gateway to be used with that specific carrier, please see SIM card management for SIM card requirements and APN configuration.
To connect your 4G-based gateway:
- Insert the SIM card
- Attach the included antennas to the back of your 4G Gateway
- Insert the included power adapter in a wall outlet and connect it to the power port on the gateway
- Configure the APN by using the guide found under SIM card management
Note
Once your infrastructure is connected according to the instructions above, the lower status LED on your gateway should blink green, indicating you are ready to register your hardware in Yanzi Lifecycle.
2. Register infrastructure in Lifecycle
- Sign in to Yanzi Lifecycle
- Select Locations in the left-hand menu and click + New
- Follow the on-screen installation wizard.
Warning
Please note:
1. If you planned your install already using Prospects, ensure you select that prospect in the form.
2. It's not possible to move a Location from one Group to another, select Group with care.
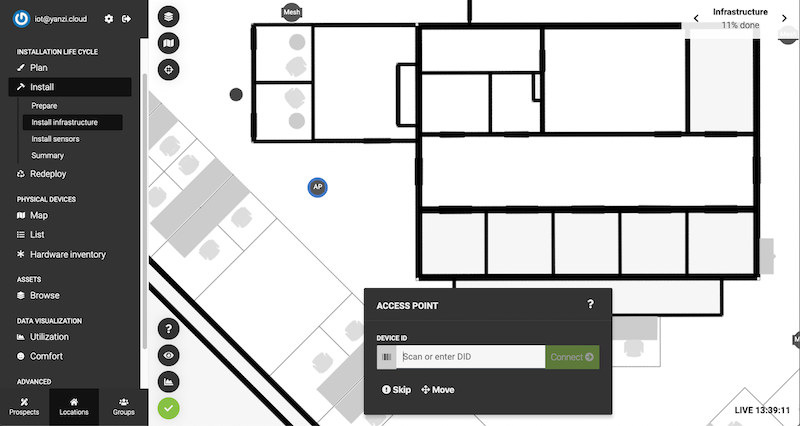
Access Points
If you are deploying Access Points to your installation, follow the below steps:
- In the left-hand menu of your new Location, first, select Install and then Install infrastructure.
- Click the first Access Point (AP) you want to add on the map and connect it by scanning or manually entering the DID as shown below
- Click Connect
Install sensors
Note
You should now have your Yanzi infrastructure up and running and be ready to start installing sensors.
- In the left-hand menu of your new Location, first select Install and then Install sensors.
- Click the first sensor you want to add on the map, and connect it by scanning or manually entering the DID in the field shown below.
- Turn on the sensor.
For more information see buttons and switches - Click Connect.
The sensor will then first turn yellow, indicating that the system has processed your request to install the sensor, but it's not yet connected. After a few minutes, it will turn green and indicating that the sensor now is successfully connected and sending data.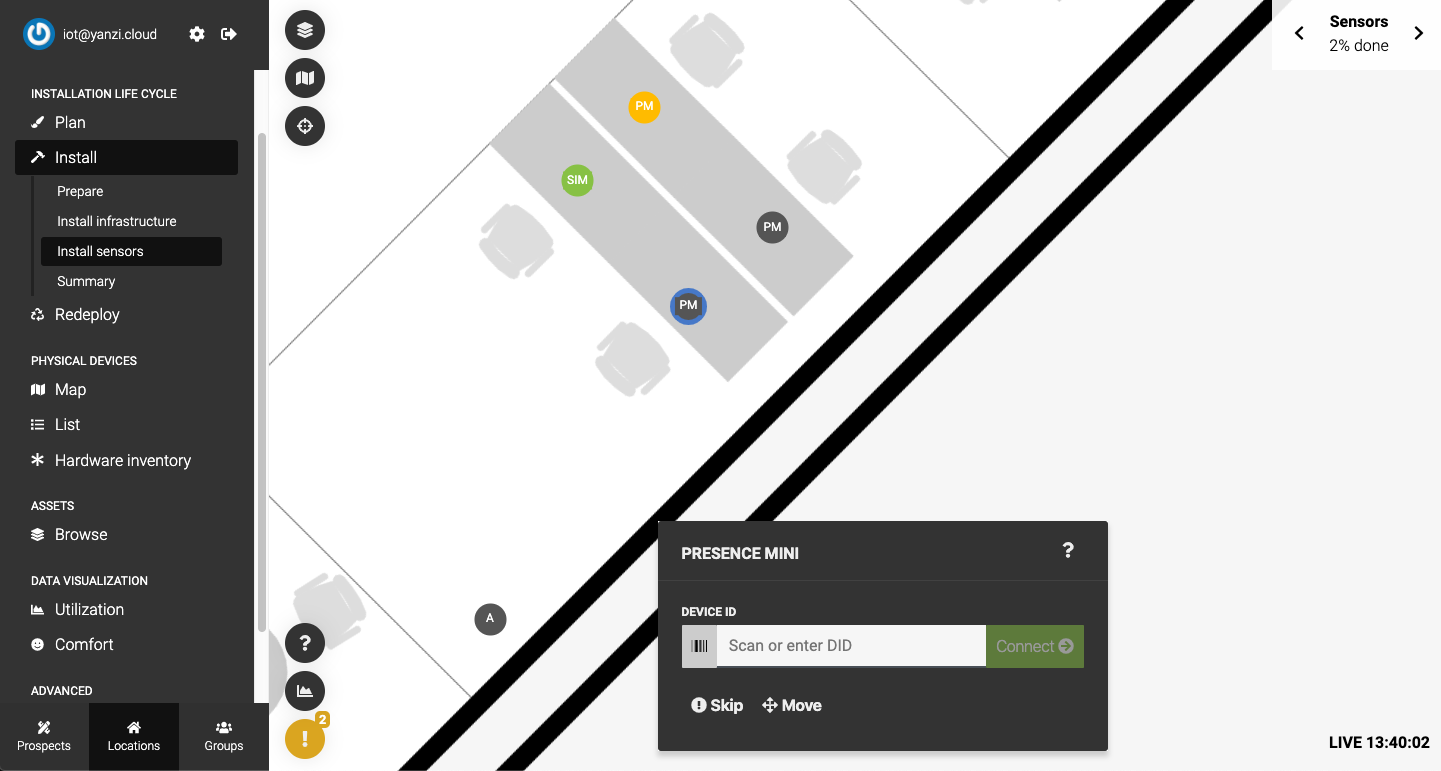
- Physically install the sensor by removing the non-stick film of the adhesive tape and pressing the sensor firmly into place for at least 10 seconds.
Note
Please see the details on fastening sensors as well as our tips on placement.
- Repeat steps 2-5 for all your sensors.
Once you are done installing all your sensors, select Summary in the left-hand menu to confirm that all devices have been successfully installed.
If you have sensors that are not connected after 15 minutes, verify that they are powered on and then poke the status button to wake it again from its netselect sleep cycle.
Factory Reset
This section covers how to partially, or completely, factory reset a Yanzi installation.
Resetting a Location
-
In the INSTALLATION LIFE CYCLE submenu, select Factory Reset
-
Follow the steps in the wizard that appears to factory reset your Yanzi location.

Resetting individual sensors
Should you want to remove one or a few specific sensors, the Lifecycle tool supports this too.
-
In the PHYSICAL DEVICES submenu, select Map
-
Click the sensor you want to factory reset
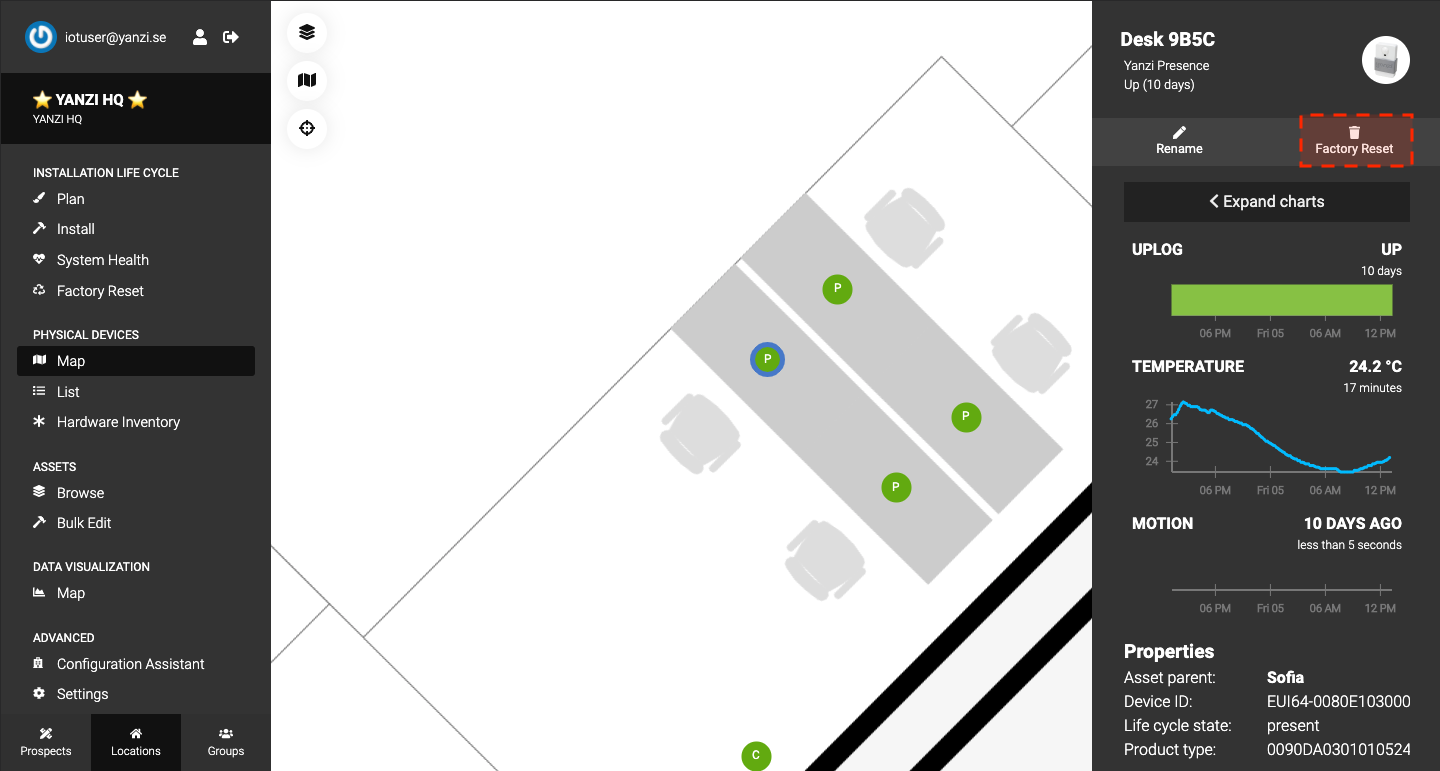
- In the right-hand sidebar that appears, click Factory Reset.
Using the configuration assistant
See instructions here
Planning and executing a successful Yanzi Installation
Proper planning is crucial to execute a Yanzi Installation smoothly. We will help you all the way and we have put together a checklist for the key moments so that you and your team can verify that everything is in place to proceed.
Here you can find the latest Deployment checklist.
Infrastructure
This section covers some useful information on Yanzi infrastructure. The product briefs can be found here.
Network requirements
The following section applies to Ethernet-based installations.
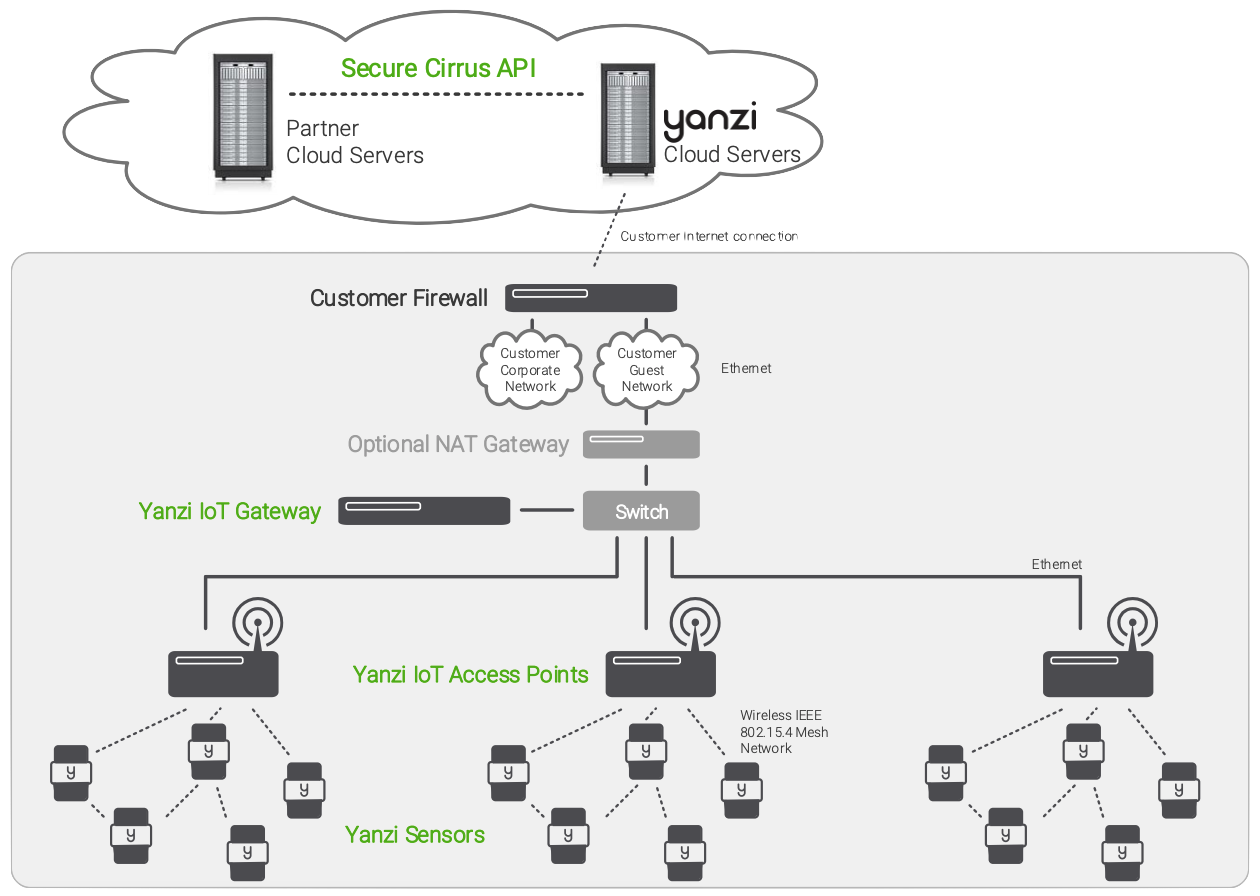
Example network illustration shown above.
The requirements for the connection of a gateway to the Cloud can be seen below:
- The firewall allows outgoing TCP connections to any IP over port 443. In addition to this, today some of the listed below IPs must be accessible over 4445 too.
- There is a DHCP server providing the Yanzi Gateway and Access Points with an IP.
- The DHCP server returns a valid DNS server.
Currently, the below list contains all IPs for Yanzi's cloud servers the gateways may connect to. The gateway will normally select a default server but might require communication with other servers for normal operations.
Warning
Please note that this list can change at any time.
Yanzi recommends putting all Yanzi equipment on a separate VLAN.
To summarize, the gateway needs to be able to
- create outgoing TCP connections to all the below IPs on the listed port.
- reach the DNS server returned by the DHCP server
IP Address Table
The Yanzi devices may connect to the following pool of ip-addresses while in use.
For EU customers currently in use
| IP address | Port | DNS | Region | Comment |
|---|---|---|---|---|
| 34.77.72.219 | 443 | cop.yanzi.se | EU | |
| 35.205.227.41 | 443 | peering.yanzi.se | EU | |
| 34.38.16.100 | 443 | p8.yanzi.se | EU | |
| 35.233.31.97 | 443 and 4445 | p31.yanzi.se | EU | |
| 35.233.43.133 | 443 and 4445 | p22.yanzi.se | EU | |
| 104.155.36.197 | 443 and 4445 | p5.yanzi.se | EU | |
| 35.205.36.194 | 443 | p9.yanzi.se | EU | |
| 104.155.41.231 | 443 and 4445 | p10.yanzi.se | EU | |
| 104.155.18.128 | 443 and 4445 | p14.yanzi.se | EU | |
| 35.241.208.156 | 443 and 4445 | sina-ab-0.yanzi.se | EU | |
| 35.205.132.69 | 443 and 4445 | sina-ab-1.yanzi.se | EU | |
| 104.155.63.198 | 443 and 4445 | b1.yanzi.se | EU | |
| 35.195.176.17 | 443 and 4445 | sonera-ls.yanzi.se | EU | |
| 104.155.29.179 | 443 and 4445 | - | EU | Next in line for capacity improvements |
For US customers currently in use
| IP address | Port | DNS | Region |
|---|---|---|---|
| 34.77.72.219 | 443 | cop.yanzi.se | EU |
| 35.205.227.41 | 443 | peering.yanzi.se | EU |
| 146.148.97.22 | 443 and 4445 | p15.yanzi.se | US |
| 35.185.15.80 | 443 and 4445 | Spare | US |
Old that has been removed
| IP address | Port | DNS |
|---|---|---|
| 192.195.136.214 | 443 | |
| 35.196.48.32 | 443 and 4445 | |
| 104.211.54.234 | 443 | |
| 13.79.6.79 | 443 | |
| 13.82.217.230 | 443 and 4445 | |
| 35.189.0.234 | 443 and 4445 | |
| 35.197.212.119 | 443 and 4445 | |
| 35.189.96.140 | 443 and 4445 |
Requirements for connection with IoT Access Points
The requirements for the connection of a gateway to an access point can be seen below:
- The UPnP/SSDP packets should be allowed on the network.
- The port 1900 needs to be allowed for the UPnP discovery.
- When using IoT Access Point 3, link-local IPv6 is required
- Multicast should be allowed as well so that the APs and GW can send broadcast packets to the IPv4: 239.255.255.250 / IPv6: ff02::c
Using Yanzi with a proxy
Additional requirements apply when using Yanzi hardware with a proxy. Please contact us for more details.
Connecting your gateway with an external 4G router
In some markets where the Yanzi IoT Gateway 4G is not available, and when you can't use existing Ethernet for internet access, using an external 4G router is a good option.
Note
Yanzi recommends using professional routers such as the Sierra Wireless ES450 or similar.
To connect your Yanzi Gateway to an external 4G router, follow these steps:
-
Insert your SIM card and configure your router according to the manufacturers/carriers' instructions.
-
Verify that the router manages to establish a stable internet connection.
E.g. by connecting the 4G router directly to your laptop and browsing the internet. -
Connect the gateway to the router with a standard Ethernet cable, see ports and switches.
-
Verify that the gateway successfully connects to Yanzi Cloud servers, see LED behavior.
Warning
Good radio coverage is required for the service to work well. Verify prior to installation that the chosen operator has 3G and 4G access in the building where Gateways are to be installed. Note that even if the operator says the area has coverage, it doesn’t mean coverage is available inside the building.
Gateway wall and ceiling mount
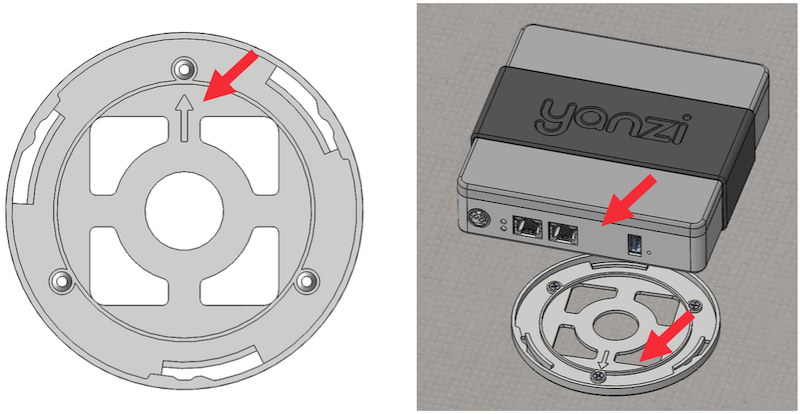
Yanzi IoT Gateway 2/DR3-3143 revision R1E and later revisions feature a Wall and Ceiling Mount. Please note that this wall and ceiling mount does not fit previous revisions of the gateways.
Yanzi IoT Gateway 2 attached to a drop-in ceiling tile.
After attaching the wall and ceiling mount to the drop-in ceiling tile the Gateway snaps into place by twisting it clockwise.
The arrow on the wall and ceiling mount should be used as a reference during the installation. When the gateway has been snapped into place the arrow should be pointing towards the front panel of the gateway. This simplifies cable arrangement during the installation.
Figures below show a section view of the correct installation for secure attachment to a drop-in ceiling tile:
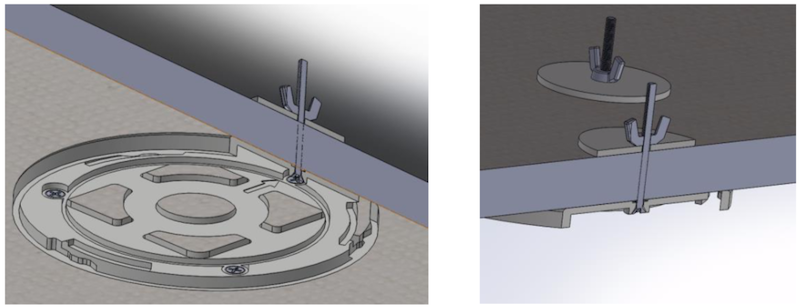
Section view showing correct installation on a drop-in ceiling tile.
Gateway LED Behavior
The Yanzi IoT Gateway 2 has two LEDs that indicate current power and operational status.
| Gateway LED State | Yanzi IoT Gateway 2 |
|---|---|
| Top LED (Power) | |
| Off | Power is off |
| Steady green | Power applied and the gateway is turned on |
| Steady orange | Hardware error |
| Bottom LED (Status) | |
| Off | Status LED is off whenever the gateway is off and during boot |
| Blinking green | Gateway is ready to be registered in the portal |
| Steady green | Gateway is connected to the portal |
| Blinking orange/yellow | Cloud connection error, i.e. the gateway can't reach the cloud. For Ethernet-based gateways, please ensure you are following the network requirements If you are using a IoT Gateway 4G, this could indicate that all the monthly data has been consumed |
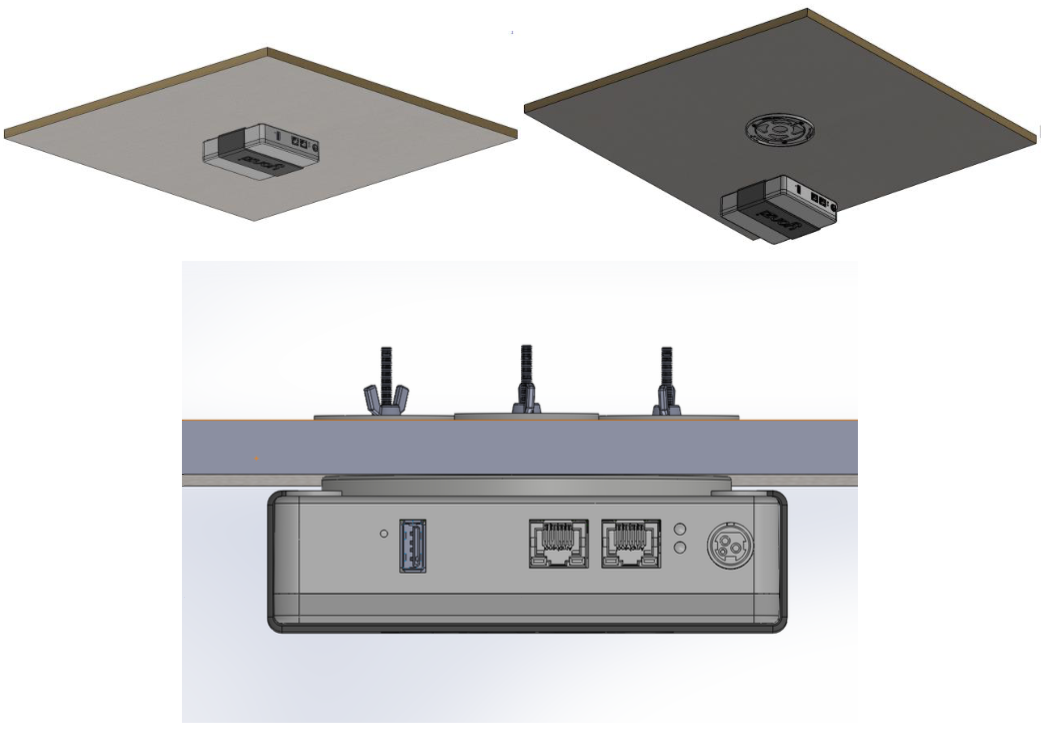
Gateway ports and switches
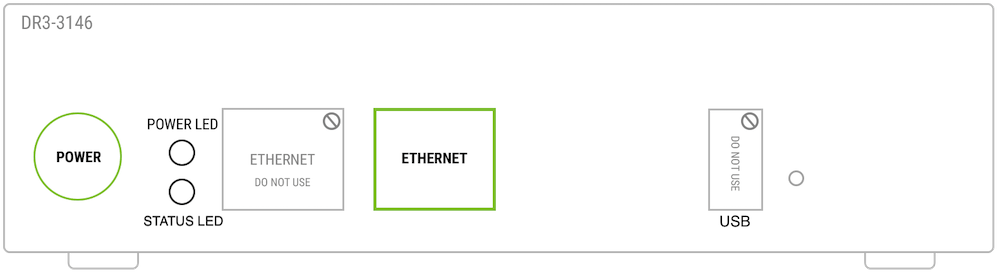
| Port | Description |
|---|---|
| Power Port | Only use the included Yanzi Wall Adapter. |
| Ethernet Port | 1x 10/100 Ethernet port (DR2-88xx) 2x 10/100 Ethernet ports (DR2-89xx) 2x 10/100 Ethernet ports (DR3-31xx) |
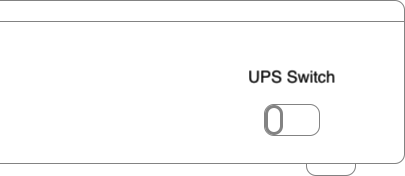
| UPS Switch | Enables/disables built-in battery backup. Push to front to disable. Push towards rear to enable. |
| Power/Status LED | Indicates power and operational status. See LED Behavior |
| USB Port | Reserved. Do not use. |
SIM card management
Yanzi Gateways with mobile broadband are shipped without SIM card inserted. This section describes the requirement for the SIM card as well as for instructions on how to add a SIM card and configure the Gateway accordingly
SIM requirements
| Item | Requirement | Note |
|---|---|---|
| Bandwidth | Minimum HSPA | HSPA is up to 5.76Mbit/s |
| Data amount | 1 - 20 GB/month | Data usage heavily depends on the implementation of the analytics, front-end and end-usage. |
| Over-usage of data | - | Strongly recommended that operator does not incur extra charges for over-usage of data. Customer will be responsible for any extra charges. |
| PIN | No | Pin code must be disabled |
| APN | Standard APN and APN authentication (username/password) | APN and APN authentication must be made available to Yanzi at the time of order if Gateway is to ship pre-configured. |
| Size | Micro-SIM | - |
| Management | - | Web interface with over-usage warning recommended |
| Network frequency | 850/900/1900/2100MHz | - |
Warning
Good radio coverage is required for the service to work well. Verify prior to installation that the chosen operator has 3G and 4G access in the building where Gateways are to be installed. Note that even if the operator says the area has coverage, it doesn’t mean coverage is available inside the building.
Estimating data usage
A simple estimate is (0.6 mb x [number of devices] + 50mb) per month. It is possible to use the API to fetch data multiple times from the gateway -- this calculation assumes that each measurement is fetched exactly once.
Replacing SIM card
- Remove the grey Yanzi sleeve from the IoT Gateway
- On the left-hand side of the gateway, carefully use a sharp tool to push the SIM card inwards in the SIM card slot to insert or remove it. You will hear a click when the SIM is in place.
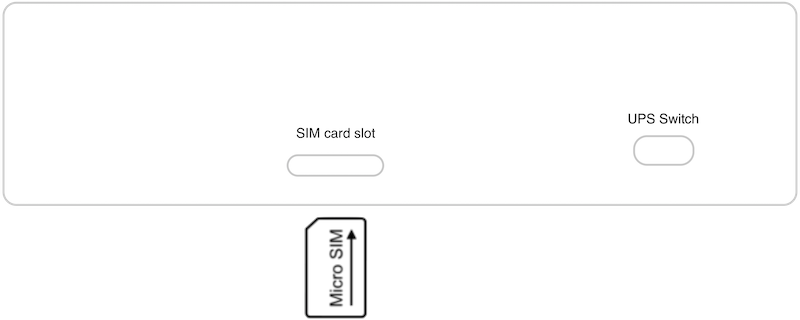
Insert the SIM card according to the illustration above
Warning
Please not that you will have to update the gateways APN configuration if you change operator.
APN configuration
Please contact Yanzi Support for APN configuration.
Sensors
This section covers some useful information on Yanzi sensors. The product briefs can be found here.
General tips on placement
General placement tips
- Try to place the sensors in discrete locations
- Place sensors along walls at about 150-170 cm (60-70 inches) from floor
- Sensors are attached using adhesive tape
- Target wood, plastic, or metal surfaces that are flat
- Avoid wallpapers as they may break if sensor must be removed
- Avoid painted walls when using adhesive tape as modern paint is efficient in repelling adhesive tape
- Wipe target surface with a cloth to remove dust, dirt, and grease
- Remove tape cover and press firmly for 10 seconds. After 10 seconds, the adhesive tape is strong enough to hold the sensor. Full adhesiveness is reached after 72 hours.
Sensor and use case specific recommendations
Yanzi Motion+
- Place on wall of smaller rooms such as conference rooms and phone booths
- Place in ceiling above groups of 4-8 work desks
Yanzi Comfort
- Place on the wall between 150 and 170 cm above the floor.
- Place vertically with the power connector facing downwards.
- Place at least 5 meters away from windows, ventilation distributors, or heating elements. If no 5 meter distance exist in a room, place the sensor at the furthest point from these sources.
-
Do not place above a desk or any device or machine that generates heat.
-
Requires a power outlet within the length of the cable (available separately)
Yanzi Health
- Place on the wall between 150 and 170 cm above the floor.
- Place vertically with the power connectors facing downwards.
- Place at least 5 meters away from windows, ventilation distributors, or heating elements. If no 5 meter distance exist in a room, place the sensor at the furthest point from these sources.
- Do not place above a desk or any device or machine that generates heat.
-
The back plate can be fastened with tape and/or screws.
-
Requires power through PoE or USB-C (cables and psu available separately).
Yanzi Presence and Yanzi Presence Mini for work desks
- Place under work desk about an arm’s length from edge with the sensor element on the chairside
- The back of the sensor is taped to the bottom side of the work desk with the sensor element (PIR sensor) facing down and towards the chair.
Warning
To avoid false triggering, using a PIR field of view limiter is recommended
Yanzi Presence and Yanzi Presence Mini for conference room chairs
- Place under work desk about an arm’s length from edge with the sensor element on the chairside
Warning
To avoid false triggering, using a PIR field of view limiter is recommended
Yanzi Presence and Yanzi Motion+ for conference room overall occupancy
- Place in corner of smaller rooms and along walls in larger rooms
- Face away from windows to avoid direct sunlight
- Face away from doors to avoid detecting people walking outside the room
- Use multiple sensors for large rooms (>20m2)
Warning
To avoid false triggering, using a PIR field of view limiter is recommended
Fastening sensors
Most Yanzi sensors are delivered with adhesive tape for fast deployments. This tape is very strong if correctly applied which is good for permanent installations but may be difficult to remove for short term installations, called episodic installations. For episodic installations, Yanzi recommends using a slightly weaker tape that is easier to remove even after 3-6 months.
Yanzi standard tape delivered on sensors: 3M™ VHB™ Tape 59-series.
Tape recommended for episodic installations: 3M™ VHB™ Tape 49-series.
For recommendations from the tape manufacturer on how to remove the tape in case of uninstall, you can access the following documents: VHB™ Tape Disassembly Instructions and VHB™ Tape Removal Systems
Occupancy detection cones
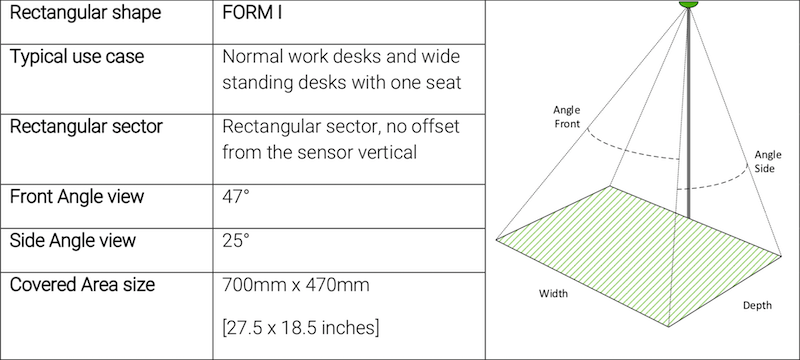
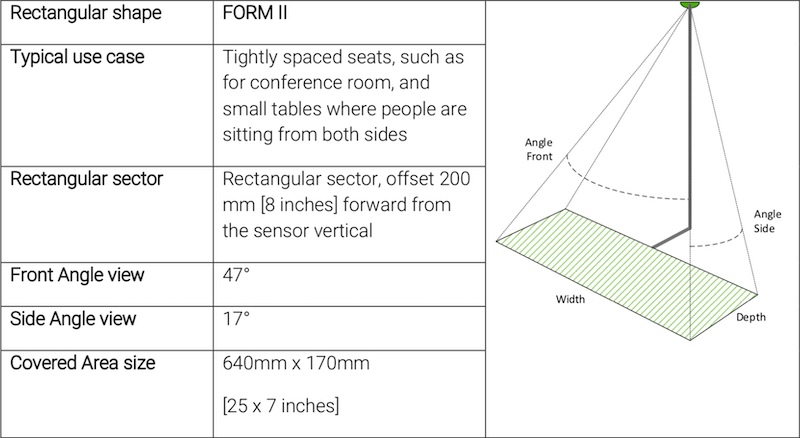
For occupancy monitoring, the default detection cone (field of view) of a PIR sensor may not always be optimal. Yanzi supplies field of view limiters with the simple operation of covering the lens so the detection cone becomes smaller. This way the detection cone can be optimized for different use cases. This section describes the actual detection cone for different types of field of view limiters.
Presence Mini
All the following information assumes the distance of the sensor from the floor is 640mm [25 inches].
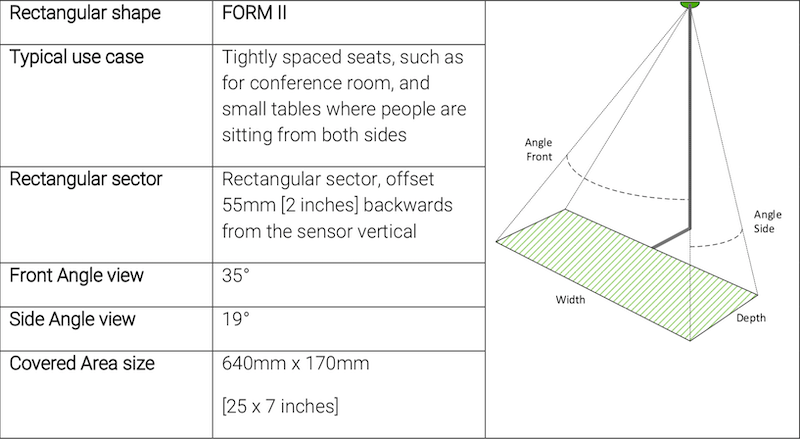
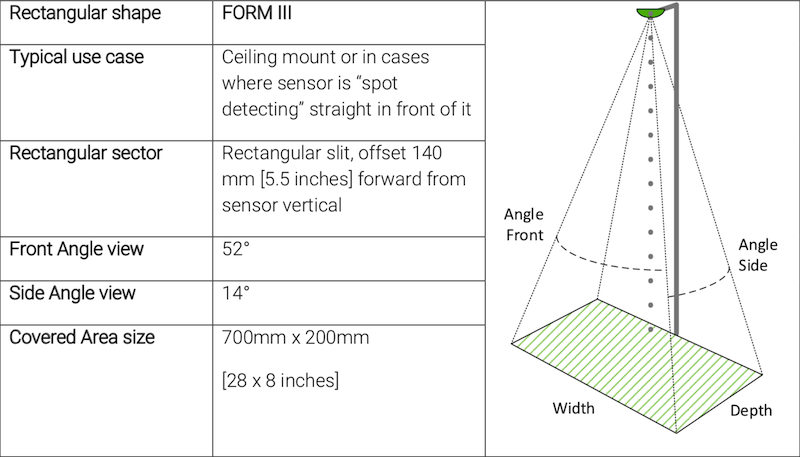
Motion+ and Presence
All the following information assumes the distance of the sensor from the floor is 640mm [25 inches].
LED Behavior
All sensors turn the LED off a short while after power has been applied to avoid light pollution. Pressing the status button turns the LED on to display the sensors' current status.
| Sensor LED State | Description | Note |
|---|---|---|
| Off | Power is off or sensor is in sleep | |
| Short orange or green blink | Power has just been applied and sensor is booting up | Wait a few seconds for actual status |
| Blinking green (slow) | Sensor is ready to be peered with a location | Use the installation tool to peer the sensor with a Gateway (Location) |
| Steady green | Sensor is peered with a location and working | |
| Steady red | Sensor can't reach the gateway it's peered to | If this sensor has been moved from one Location to another, it may need to be reset to factory default. |
| Blinking red (fast) | Sensor is about to be reset | |
| Blinking red/green (fast) | Sensor has been reset to factory default |
Buttons and switches

Yanzi Motion+ shown as example above
Most Yanzi sensors have a status button, pressing the status button will indicate the status using the LED, see LED behavior.
Sensors ship with batteries already inserted and therefore have a power switch. Carefully push the switch to its upper position to turn on the sensor. Should you want to turn off the sensor, carefully push it to its downward position. Use a sharp tool such as a paper clip or mobile phone SIM card ejector to flip the switch.
Sensor netselect
Whenever you turn on a sensor that's in factory default mode, it will enter a state called netselect. This means the sensor will actively broadcast its presence on all Yanzi IoT radio channels so that it can be found and connected to the gateway you have peered that sensor to using Yanzi Lifecycle
Since netselect causes significant wireless activity from the sensor, it consumes a lot of power. Therefore, the sensor will be sleeping between each time it wakes up to broadcast its presence, this sleep cycle gets longer over time to make sure the sensor won't drain its batteries if left on (and not connected to a gateway).
| Time since power on | Battery powered sensors | Externally powered sensors |
|---|---|---|
| First hour | Every fourth minute | Every minute |
| After an hour | Every hour | Every minute |
| After 24 hours | Every four hours | Every ten minutes |
Note
You can reset the exponential sleep cycle shown above by pressing the status button or by turning the sensor off and then back on.
Resetting a sensor to factory default
If you need to reset a sensor to factory default, hold the status button (see sensor buttons and switches) on the sensor pressed for about 10 seconds.
- Press and hold the status button
- After about 3 seconds the LED will start blinking red rapidly.
- After another 5 seconds, the LED will rapidly shift between red and green.
- This serves as a confirmation that the sensor will be reset when you release the status button.
- The sensor will now reboot in factory default and after a few seconds start blinking green showing it's ready to be installed in a Yanzi system.
Warning
Please note this will only set the sensor to factory default, not removing it from the system. This means that the sensor will, if still in range, reconnect to its gateway.
If you need to factory default and remove a sensor from a system, see resetting individual sensors.
Inserting and changing batteries
The battery powered sensors operate with 2 or 4 batteries. Two batteries make the product run for approx. half the time. When using two batteries, please use the bottom two battery slots as shown below.
Warning
It is very important to follow the battery requirements when inserting batteries.
Verify that the front panel LED is turned on within 5 seconds after inserting batteries. Note that it may only be turned on for a very short while to save battery. If you do not see the LED come on even for a short while, please remove the batteries and re-insert them again.

Sensor data
Activity level
Sensors are regularly communicating with the Gateway to validate the connection. Sensor data is transmitted either regularly at a certain period or as an event, such as a motion event from an occupancy sensor. The period is configured as part of the activity level. The table below shows the typical communication periods of the different sensor elements based on the activity level. The default activity level is Medium. Changing to activity level High increases the number of samples received but also increases the energy consumption of the product.
| Product | Sensor | Poll time Activity Low |
Poll time Activity Medium |
Poll time Activity High |
|---|---|---|---|---|
| Presence Mini | PIR | Event or every 4 minutes | Event or every 2 minutes | Event or every 1 minutes |
| Temperature | 4 minutes | 2 minutes | 1 minute | |
| Motion+ | PIR | Event or every 4 minutes | Event or every 2 minutes | 1 minute |
| Temperature | 4 minutes | 2 minutes | 1 minute | |
| Humidity | 4 minutes | 2 minutes | 1 minute | |
| Ambient light | 4 minutes | 2 minutes | 1 minute | |
| Ambient noise | 20 minutes | 10 minutes | 5 minutes | |
| Comfort | Temperature | 4 minutes | 2 minutes | 1 minute |
| Humidity | 4 minutes | 2 minutes | 1 minute | |
| CO2 | 4 minutes | 2 minutes | 1 minute | |
| VOC | 4 minutes | 2 minutes | 1 minute | |
| Barometer | 4 minutes | 2 minutes | 1 minute | |
| Ambient noise | 4 minutes | 2 minutes | 1 minute |
Details on sensor data
The details about each sensor element can be found in the respective product brief but this section summarizes how to make measurements for best result. Also, follow the guidelines in general tips on placement for best placement.
Temperature and Humidity
Room temperature is best measured using a battery-driven, high accuracy, sensor such as Yanzi Motion+ or Yanzi Climate. Accurate data is typically available within 10 minutes after peering. Values during the first 10 minutes may show higher temperature values due to physical handling of the sensor during installation and internal energy usage during the peering process. Note that powered sensors may not provide the same level of accuracy for temperature and humidity due to the internal energy produced.
Volatile Organic Compound (VOC)
The TVOC sensor is automatically calibrated, and the values are available within 10 minutes of installation. It is important that the sensor is placed vertically to allow for efficient airflow.
VOC are defined by the WHO (1989) as Volatile Organic Compounds with a boiling point between 50°C and 260°C. VOC are general pollutants in indoor air that exceeds outdoor concentrations by more than a hundred times. Several hundreds of different VOC have been identified. Determining the source of a specific VOC is very hard to achieve as most VOC has several sources.
TVOC (or Total VOC) represents the total concentration of all VOC’s. TVOC is a general term not defining the combination and proportion of the measured VOC.
Common sources of VOC’s are outdoor air, tobacco smoke, other combustions, construction material, and humans or animals. Most VOC’s in indoor air can be considered as odorous irritants.
Yanzi Comfort reports the measured TVOC equivalent and is sensitive to a range of VOC such as alcohols, aldehydes, ketones, organic acids, amines, aliphatic, and aromatic hydrocarbons, etc.
Carbon Dioxide (CO2)
The CO2 sensor is automatically calibrated, and the calibration period normally finishes within 72 hours after power on. This means that the accuracy of the values prior to 72 hours may not be within specification. Automatic calibration requires that the CO2 level in the room reaches outdoor levels of 400 ppm at least once during every 24-hour period which is usually the case for office environments. The CO2 sensor is not recommended to use in areas where people are present 24/7, and the CO2 level does not reach outdoor levels, such as for hospitals, industries, etc. It is important that the sensor is placed vertically to allow for efficient airflow.
Ambient Noise
Noise level in dBA is available within minutes after installation. The physics around noise needs to be considered when placing noise sensors as sound pressure level decays quickly with the distance from the source but this is outside the scope of this document.
Ambient Light
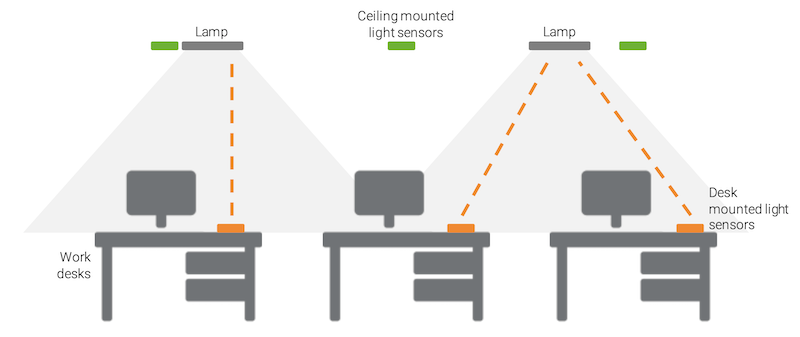
Yanzi light sensors are designed for relative light measurements. By setting thresholds on what is good lighting level, the system can alert if there are any changes, up or down. By comparing the light levels on Yanzi sensors with a one-time calibration on desks, the actual light intensity may be approximated from the relative measurements.
Depending on the use case, different placements may be required for optimal performance. Typically, for work desks, reflective light measurement in the ceiling is a good choice. For detecting if lights are on or off in a conference room, for example, wall placement usually works well.
One of the benefits of ceiling mount measurement is that the positioning of the sensor in the ceiling is less sensitive. Sensors placed on desks are often moved or end up under other items disturbing the measurements.
The intensity of reflected light is much smaller than direct measurements. So the drawback of this type of measurement is that the sensor must be calibrated if it should indicate the actual lux level on the desk (which is typically measured ”looking up”).
Further details on ambient light
Motion+ use a digital RGB+IR ambient light sensor (ALS). It has the capability to monitor light intensity in 4 individual channels of red, green, blue, and IR. The data from these 4 channels are used to calculate the total light intensity in lux as well as the color temperature of the light. This calculation is performed in the Gateway before sending it to the API.
Light is measured according to activity level (every 2 minutes by default but can be set to every 1 minute or every 4 minutes as well).
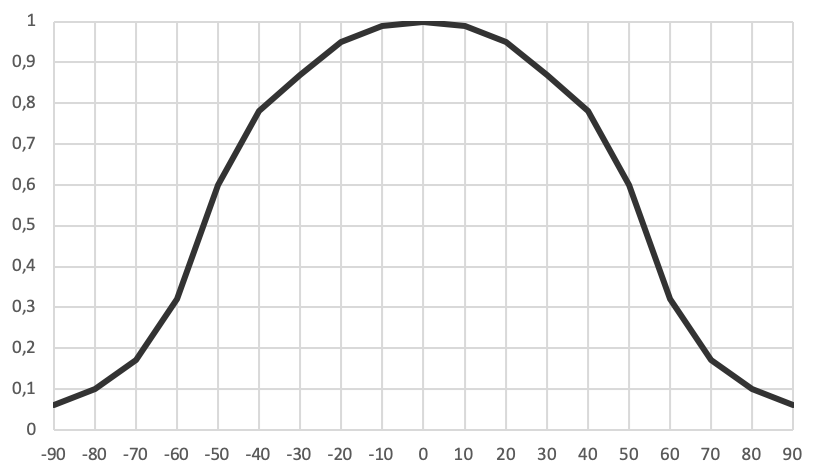
The integration time for the ALS is set to 3ms which corresponds to very accurate readings above 30 lux (30 lux is considered dark and humans require more than 30 lux to gain full-color vision). Below 30 lux, the accuracy of the sensor decreases. This threshold is set to save battery life as integration time is exponentially longer the darker it gets.
The angle of incoming light affects the response. The normalized angular response is shown in the graph below.
Occupancy
Occupancy is measured using passive infrared (PIR) sensors which means it detects movement of objects with different temperatures from the background temperature. PIR sensors have been used in security systems for 30+ years so the technology is well tested and the lenses used on Yanzi sensors are very sensitive to detect even small movements.
Field of view limiters are available to modify the area of detection.
Yanzi Footfall
The following section contains information about the Yanzi Footfall and Yanzi Footfall 3D.
General requirements
Warning
The Yanzi Footfall camera must:
* Be mounted with the correct orientation
* Be in an area where people do not stagnate
* Be in a place with adequate illumination
* Be outside of the door opening area
* Be mounted horizontally. Ground can be a slope (in case of an access ramp for instance)
Depending on the ceiling height, the width the camera will be able to count varies as shown below.

| Yanzi Footfall 3D | Height (A) | Width (B) | Yanzi Footfall | Height (A) | Width (B) |
|---|---|---|---|---|---|
| 2.5m | 2.1m | 2.5m | 2.5m | ||
| 2.75m | 2.7m | 3.0m | 3.5m | ||
| 3.0m | 3.2m | 4.0m | 5.5m | ||
| 3.25m | 3.8m | 5.0m | 7.0m | ||
| 3.5m | 4.3m | 6.0m | 9.0m | ||
| 3.75m | 4.9m | 7.0m | 11m | ||
| 4.0m | 5.5m | 8.0m | 12m |
The footfall camera must be correctly aligned and oriented as shown below:

Ensure that the door won't open directly under the cameras counting area:

Footfall Networking Requirements
- A DHCP server must issue an IP address to the device.
- The network must allow multicast for discovery. This typically means that the device and the Yanzi Gateway must be on the same subnet.
- The device must be reachable by the gateway over the network.
Footfall Installation Guidelines
Warning
Please, read carefully the following Installation Guidelines: Comptipix 3D Configuration
Installation and configuration
-
Mount the camera in the ceiling, having considered the requirements listed above. Make sure you connect the camera using an PoE switch as it gets power over Ethernet. Please note that the footfall camera must be connected to the same network as the Yanzi Gateway
-
Log in to the footfall camera by typing in its assigned IP-address in your internet browser of choice. The default login credentials - username: admin and password: admin
Please note that you have to be connected to the same LAN when configuring the footfall from your computer. To find its assigned IP-address, look in your DHCP client list or use the footfall detection software. -
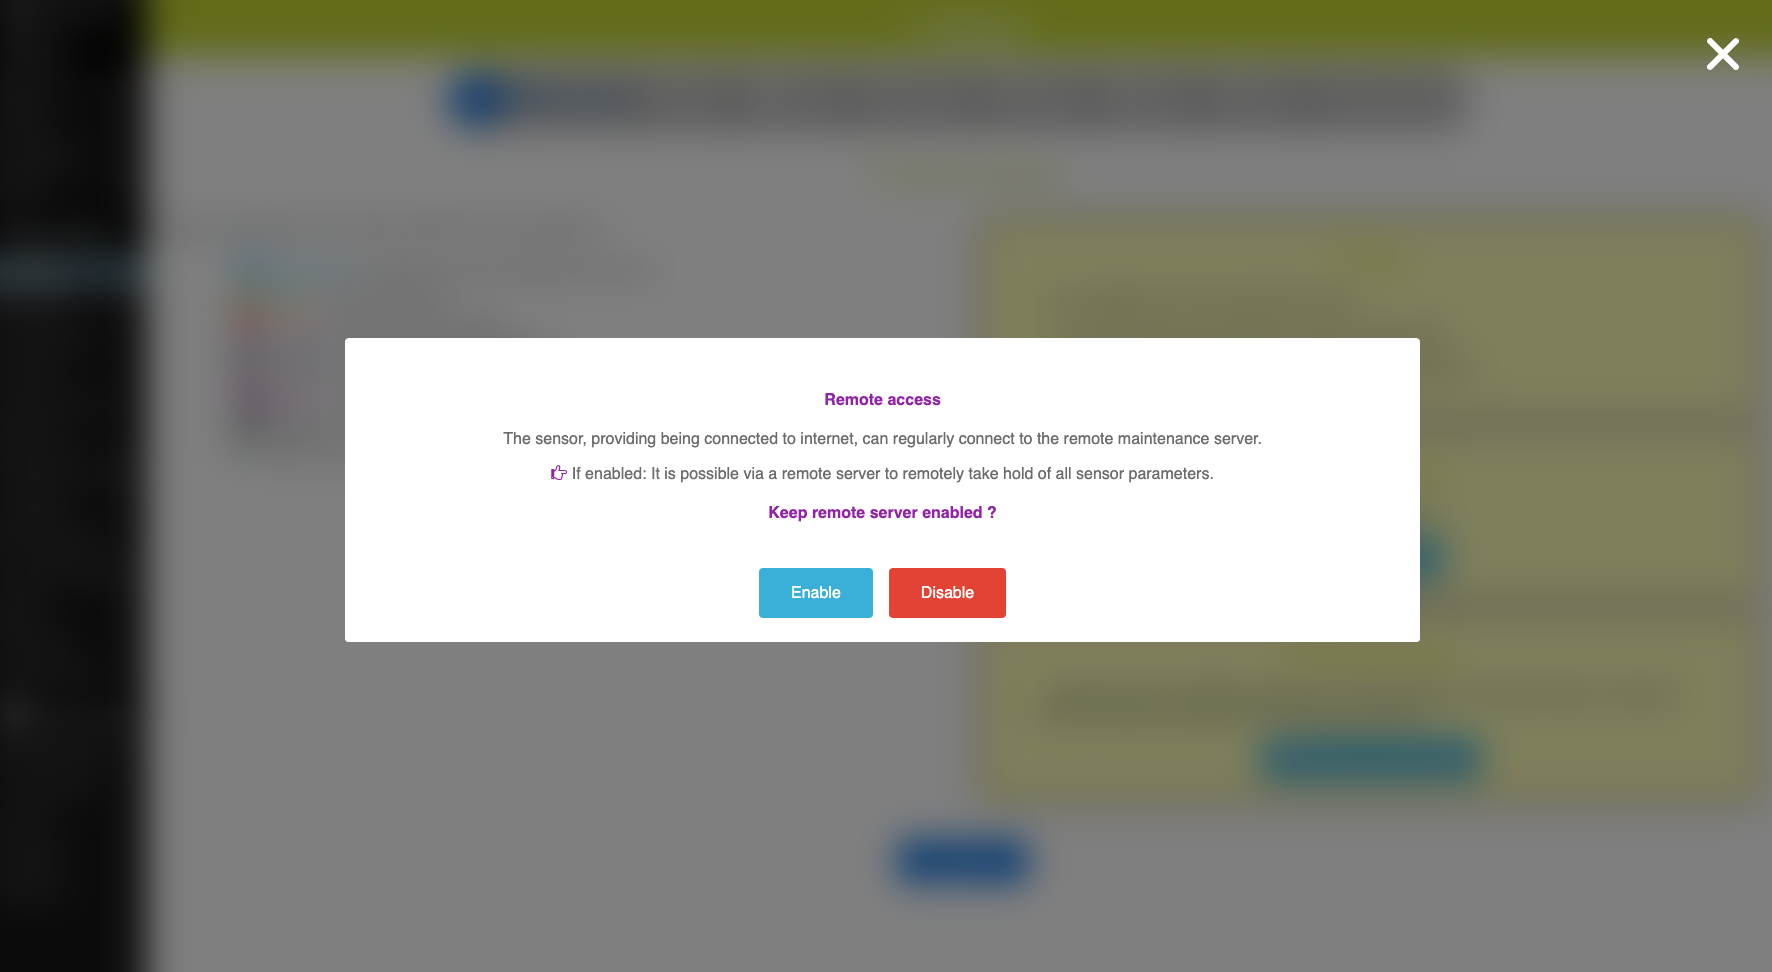
When logged in, click Wizard and follow the steps to configure the footfall camera. If it is the first time configuring the camera, you will get a prompt asking if you want to disable the remote server access. It is safe to disable that access if your company firewall policy only allows specific IPs. The camera will be managed by your local Yanzi system so the camera does not need to reach the manufacturer servers. To disable it, click on the disable option in the prompt.
-
IMPORTANT: Make sure to update the default password to a strong password according to your company policy.
-
Once the footfall camera is mounted and configured you need to connect the footfall camera to you Yanzi Location, to do this:
a. Go to Yanzi Lifecycle
b. In the list of Locations, select the Location where you mounted the footfall camera
c. In the left-hand menu select Prepare (found under Install). In the bottom, you find all Discovered Devices, copy the device ID from your new footfall.
d. Install it like any other sensor, following these steps.
- Your Yanzi Footfall Camera is now connected and will start pushing data to the cloud
Footfall LED behavior
| LED Color | State |
|---|---|
| Orange | Network initalizaton in progress |
| Blue | Network connection OK |
| Green | One entry counted |
| Red | One exit counted |
| Pink | Writing to SD card |
| Red-Orange (blinking) | Network problem |
| Red-Pink (blinking) | SD card problem |
Assets ("Digital Twins")
Note
An asset is a representation of a physical or virtual space such as a conference room or a desk.
Some vendors refer to this as a "Digital twin".
In the yanzi platform, assets are typically automatically created by the installation process when an installation is performed on a building model. It is also possible to create assets through the API with the CreateUnitRequest message.
Assets generate data just like sensors. An example is the conference room asset, which generate data about the number of occupants and the availability of the room.
Assets exists in a hierarchy, where the top asset is the building asset. A building usually contains floor assets which in turn contains different types of rooms and so forth. See the illustration for an example of a hierarchy.
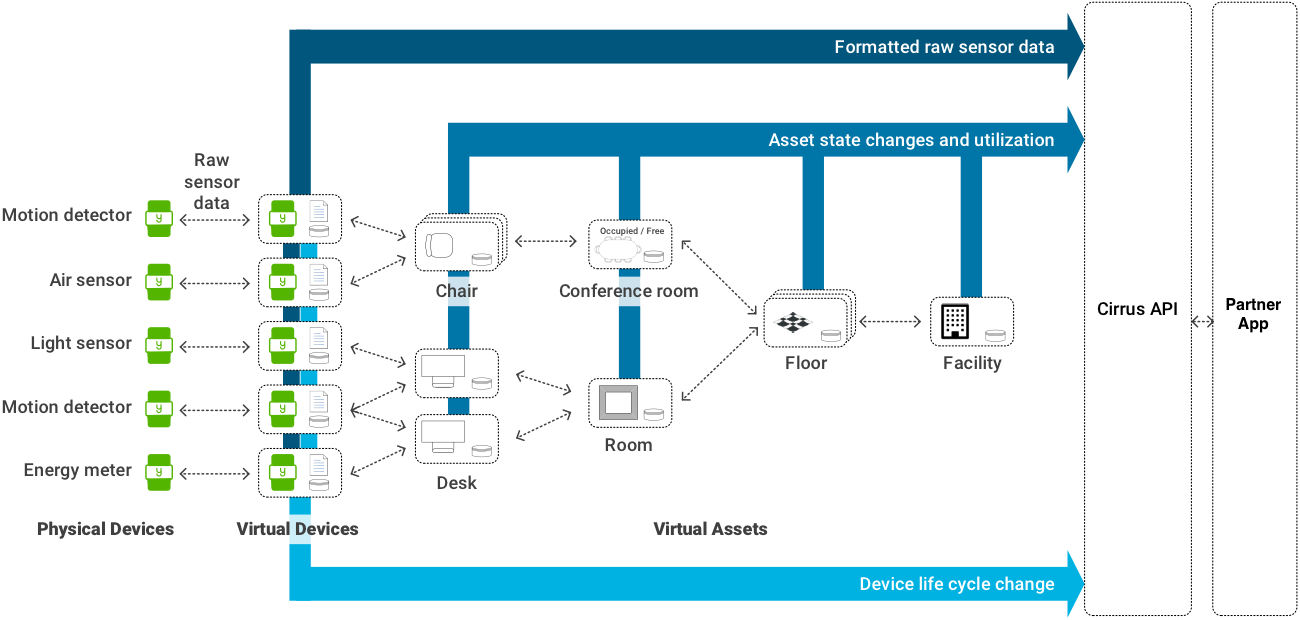
To explore the asset hierarchy, use the assetParentId property. This is automatically set on all autogenerated assets, and is recommended to be set when working manually with assets through the API.
Yanzi Lifecycle contains many tools to manage these assets, including the hierarchy browser and the configuration assistant. It is strongly recommended to use these tools to prevent incorrect data and quality issues. The api does not enforce any specific asset hierarchy as some customers use completely custom relations.
Note
For an overview of the occupancy asset, please review this document.
Technical information
Security
Security is one of the most important pillars as distributed IoT devices require high security on all links. This section gives a quick overview of the security models on Gateway to cloud and sensor to Gateway.
Secure from Node to Cloud
TLS encrypted channels from Open Cloud API to Cloud to Gateway authentication by certificate.

Automatic security provisioning of devices provides quick installation:
- Automatic key management with ECC (Vendor, Owner and Location keys)
- Application layer encryption for user data and management data including firmware updates
- Layer 2 key distribution when applicable (Wi-Fi and IEEE 802.15.4)
- Individual security keys per device with revoke capability
Not all wireless communication protocols may be available on all products in all countries. See each product brief for details.
High Security Cloud Model
All access to IoT data is authenticated in the API. All links are authenticated with client and server certificates and all communication is made using TLS encryption.
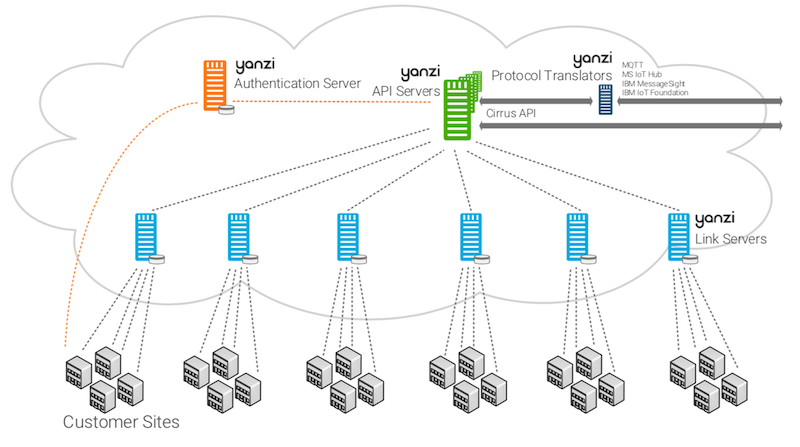
Data model:
- Authentication server (Orange) signs all certificates as well as redirects the Gateways to the correct Link server
- Link servers (Light Blue) manage Gateways and pass data to Microsoft IoT Hub via API Server.
- API servers (Green) provides a secure interface to analytics partner and acts as an aggregator for multiple link servers
- Protocol Translators (Dark Blue) translates Yanzi Cirrus API to other APIs such as MQTT.
- Local Gateway (Gray) stores all sensor data temporarily to support autonomous operation when Internet connection is down
Two Cloud Server models:
- Shared: Servers are shared between customers
- Dedicated: All data is kept within a specific cloud provider
Wireless Communication
Health aspects
All wireless communication consists of radiating antennas that transmit energy into the environment. Depending on type of application, the amount of energy transmitted in the air varies heavily. Most countries have directives that products must comply to regarding radiation. For example, the European Union has a directive called RED that limits the human exposure of electromagnetic fields. All Yanzi products comply with these regulations.
The table below shows a comparison of the power and energy transmitted by different applications. Yanzi sensors communicate using an output power that is a few powers of magnitude lower than WiFi and communicates for a few milliseconds per minute, resulting in a radiated energy that is more than 10,000 times lower than WiFi.
| Power level | Power | Usage* | Notes |
|---|---|---|---|
| 80 dBm | 100 kW | 100% | FM radio station with 50 km range |
| 60 dBm | 1000 W | 100% | Typical combined radiated RF power of microwave oven elements |
| 50 dBm | 100 W | 100% | Typical total thermal radiation emitted by a human body, peak at 31.5 THz |
| 33 dBm | 2W | 100% | Max output from a 3G mobile phone (Power class 1) |
| 30 dBm | 1W | 100% | Typical RF leakage from a microwave oven |
| 23 dBm | 0.2 W | 30% | WiFi (IEEE 802.11n), streaming video |
| 20 dBm | 0.1 W | 30% | WiFi (IEEE 802.11g) , streaming video |
| 4 dBm | 0.0025 W | 10% | Bluetooth Class 2 radio, 10 m range |
| 3 – 15 dBm | 0.002 W – 0.030 W | 0.1 % | Yanzi sensor with IEEE 802.15.4 IoT radio |
IEEE 802.15.4 overview
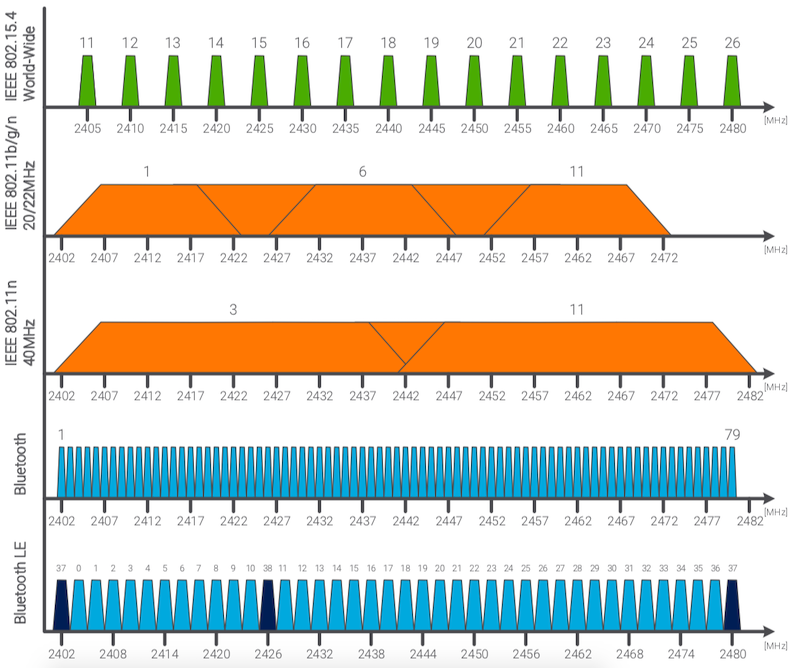
IEEE 802.15.4 is a low power wireless network optimized for battery driven devices. On the world-wide approved 2.4GHz spectrum, it supports 16 channels with 250kbps per channel where each channel has a bandwidth of 2MHz.
A comparison with WiFi, IEEE 802.11b/g/n, Bluetooth Classic, and Bluetooth Low Energy can be seen in the below picture. IEEE 802.11b uses 11 channels in US and 13 channels in Europe with a bandwidth of 22MHz per channel.
Yanzi Gateways automatically select channels for IEEE 802.15.4 that sensors attach to.
Note that this is an overview of wireless protocols only and does not reflect which wireless communication protocols are included in each product and in all countries. See each product brief for details.
Wireless communication
Wireless communication is a modern and convenient way of communication that is very fast and simple to install and still enabling a very high level of security. This makes it attractive as the main way of communication today.
There are many wireless solutions available today that all share the same wireless spectrum which can cause interference and disturbances as well as concerns regarding radiation and health. This section outlines the technologies, interference, disturbances, and health aspects of the wireless solution.
Sharing the Bandwidth
The ISM band at 2.4GHz is a globally available radio spectrum where many protocols exists such as WiFi, Bluetooth, Zigbee, proprietary solutions, microwave ovens, etc. All protocols are competing for the available bandwidth and interference is always a risk when sharing the same radio spectrum. This section shows how the protocols work and how Yanzi minimizes the affect from other devices.
To share available bandwidth efficiently and fairly, devices should not communicate longer distances than required. High density installations, typical occupancy in a smart office) requires short range communication for efficient re-use of available bandwidth. Compare spatial reuse for 3G to 4G to 5G where the cells get smaller for each new generation of mobile communication.
Yanzi sensors communicate short messages quite rare compared to many other protocols. Periodic communication with the Gateway is typically every one or two minutes and depends on type of sensor. Events (from a motion detector for example) are communicated immediately (and not periodically) for fast notifications. All communication is full duplex ensuring that all packets are received properly.
See each product brief for details.
Warning
Note: If the 2.4GHz ISM band is already fully utilized in a building, sensor data will be very difficult to transmit from sensor to Gateway.
Operating friendly
Yanzi sensors operate on world-wide standard physical medias only such as IEEE 802.3 (Ethernet) and IEEE 802.11 (WiFi) for high performance sensors, and IEEE 802.15.4 for very low power sensors. The wireless protocols are all designed by IEEE to operate simultaneously with minimum interference. Yanzi uses very low power for IEEE 802.15.4 sensors in order to operate friendly with WiFi and Bluetooth. An advanced back-off/retransmission scheme in the Yanzi sensors ensures good coexistence with WiFi networks as well as providing minimal impact from unwanted interference. The automatic channel selection in the Yanzi system further allows for avoiding impacting WiFi. The channels can even be set manually if the IT department would like to control the frequency bands used in the 2.4GHz ISM band.
Bluetooth is very resilient against interference from IEEE 802.15.4 and WiFi thanks to its frequency hopping mechanism.
IEEE 802.15.4 has a similar range to WiFi and normally operates on the same ISM band, 2.4GHz. There are Sub-GHz solutions for IEEE 802.15.4 as well but for normal high-density installations, it is not required for reach.
Battery information
Battery requirements
It is very important to follow these guidelines to avoid serious injuries. Bad handling of batteries may cause them to leak, potentially rapidly, creating a risk of injury as the internals of batteries are very corrosive. It is recommended to use Alkaline batteries in most use cases and Lithium (LiFeS2) for cold use cases.

- NOTE THE POLARITY OF THE BATTERIES WHEN INSERTING THEM. Polarity is always shown in the battery compartment as well as on the battery itself. The plus side is marked on the picture below.
- NOTE THE VOLTAGE OF THE BATTERIES. There are several voltages available for the same size of batteries. See the product manual for details on which battery to use.
- ONLY USE NEW BATTERIES. Batteries older than 1 year should be avoided as they may have aged differently and therefore cause harm when used together.
- NEVER MIX TYPE OF BATTERIES. Only use the same type of chemical compound in all batteries.
- NEVER MIX OLD AND NEW BATTERIES. Make sure all batteries used are from the same package.
- IF BATTERIES GET WARM WITHIN 5 SECONDS AFTER INSERTION, REMOVE THE BATTERIES IMMEDIATELY.
- IT IS RECOMMENDED TO USE PROTECTIVE GLASSES WHEN WORKING WITH BATTERIES.
Energy consumption
Yanzi sensors are very power efficient. Most battery driven Yanzi sensors consume less than 5uA during sleep which is class leading. Sensors wake up periodically to communicate with the Gateway with a configurable frequency. Sensors detecting motion communicates with the Gateway immediately upon motion for fast response times and goes to sleep for a certain time following a motion, called black-out period, to save battery. Things that may affect the battery life is shown in the table below. To optimize battery life time, follow the recommendations in the table below. Note that default sensor settings may differ from below requirements.
| Item | Required for 5-year battery life Yanzi Presence and Yanzi Climate |
|---|---|
| Battery | |
| Type of battery | AA, 1.5V |
| Battery chemistry | Alkaline or LiFe |
| Number of batteries | 4 (Inserted/replaced according to Yanzi Battery requirements) |
| Battery capacity | Minimum 2,700mAh |
| Usage | |
| Radio Usage | Minimum 70% available bandwidth on 2.4GHz radio channel Maximum background noise floor of -100dBm |
| Radio coverage | Minimum RSSI of -80dBm |
| Communication Interval | 2 minutes or more with 50% blackout period for events |
| Environment | 16-25°C 20%-80% |
| PIR usage | Maximum 8h per day |
| Peering process | Peered within 4 hours |
| Gateway availability | >99% |
Note on Lithium Batteries
There are several types of Lithium batteries on the market in the standard size called AA. First, care must be taken to make sure the voltage is correct according to the datasheet; 1.5V, 3.0V, or 3.6V. Yanzi has identified that several suppliers of 1.5V Lithium batteries of type LiFeS2 often produce a voltage higher than 1.8V. Voltages above 1.8V may harm products targeted for 1.5V batteries so please verify that the battery you use follows the recommendations in the product datasheet.
Privacy
This section give some tips on dealing with privacy concerns, the Yanzi Terms of Service and Privacy Policy can be found here.
There are two aspects of privacy in the Yanzi solution: 1) The user of the Yanzi solution enabling login and usage of the Yanzi service and 2) The tenant of a building where Yanzi sensors have been deployed. This section provides details on both aspects.
General Data Protection Regulation (GDPR)
The users’ privacy is important and Yanzi takes all measures necessary to handle data securely and minimize the user login data stored. Yanzi stores limited user information required to provide the service offered and is fully compliant with the EU regulations called General Data Protection Regulation, or GDPR for short. All users of Yanzi must accept the Terms of Service including privacy and data handling in order to use the service.
Privacy Note Examples
These examples are for tenants working in a building where Yanzi sensors are scheduled to be deployed. These are not related to users accessing and extracting data from the Yanzi solution. The privacy notes below are only examples and should be modified to work with your company’s privacy policy.
E-Mail Example
The following contains some information about the smart sensors we will install throughout the office to help enhance the comfort of our teams.
Installing sensors is a step towards our continuous work to improve the office environment experience for all team members. By using these sensors, we can learn more about our office building and work environment, and begin to utilize it fully.
The sensors measure parameters such as temperature, humidity, CO2 levels, light levels, motion, and ambient noise.
Being aware and able to track and analyze these factors in turn enables us to ensure a great working experience. Your workplace privacy is maintained and no video or sound is recorded at any time
If you have any questions regarding this, please do not hesitate to contact the project manager:
Desk Note Example
This desk is part of our efforts to improve the office experience and increase your comfort. A sensor has been placed under this desk. Note that this sensor only gathers anonymous data and never pictures, video, or sound. For more detailed information, please contact facility management.
Troubleshooting
Troubleshooting is moved here.